
Acoustic guitar fretboards are usually make out of dense woods like ebony and rosewood. Some fretboards are also made out of other hardwoods like maple. These woods are hard enough to stand up to the constant wear from the guitar strings.
Unfortunately, fretboards or fingerboards are no different than any other wood. If you don’t take care of it, it can crack, chip, and even have inlays come loose. In this article, I’ll explain some common problems with acoustic guitar fretboards, how to fix them, and, most importantly, how to take of and maintain them. Let’s get started!
How to Repair Fretboards
Contents
Fretboards can develop any number of different problems over years of use, especially if the fretboards are not maintained. Many older fretboards become dry and brittle because they are not conditioned or humidified properly. Another big problem that causes damage to peoples’ fretboards is poor repairs. Here are some easy ways to fix these common fretboard problems.
How to fix fretboard chips
Even though fretboards are extremely durable, they can chip for any number of different reasons. Dropping your guitar or hitting it against your amp on stage can damage the fretboard. These are obvious ways to chip your fretboard. Improper repairs might not be obvious sources of fretboard chips, but they are some of the most common.
Many people don’t understand how to remove frets, so they just rip them out with a pair of pliers. As the fret is forced out of the fret slot, the fret tang rips and chips part of the fretboard on the way out of the slot. Don’t do this! Make sure to take the time to fully loosen the fret glue before you go yanking out the frets. For information about how to properly remove guitar frets, please see the guitar fret removal page.
Ebony and Rosewood Fretboards
Repairing chips in your ebony or rosewood fretboard is really easy. Simply, take some ebony or rosewood dust that approximately matches the color of your fretboard and spread the dust in the chip.
Next, cover the dust in super glue. I suggest using Satellite City red super glue for this job. Once the super glue is dried, I like to use 80-grit sand paper and a sanding block to remove the excess glue. Then I sand the fretboard with 120-grit, 240-grit, and 300-grit sand paper. Make sure to and all around the area evenly. You don’t want a big flat or low spot in the fretboard. Use a circular motion to sand in the general area until the glued spot is level with the rest of the fretboard. You should not even be able to tell there was a chip there!
Maple and Light-colored Fretboards
Light-colored fretboards are a different story than dark fretboards like ebony and rosewood. Don’t use the old dust and glue trick on a light-colored fretboard. It will look very obvious that there is a fill. If the chip is small, simple drip some super glue in the hole and sand it off like we did earlier. The filled chip will only slightly be visible with the clear super glue.
For more information about different glues that are safe for your guitar, please see the guitar glue page.
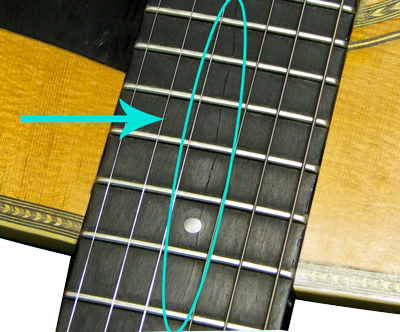
How to fix fretboard cracks
Fretboards can develop cracks if they are not properly humidified. Nothing is worse than feeling a sharp crack in the fretboard when you are learning guitar chords. Small, non-structural cracks can be easily fixed, while replacing the fretboard might be the only way to fix large cracks. If you notice that your fretboard has a small crack in it or you see a small crack start to develop, you should properly humidify your guitar. Chances are, you fretboard is extremely dry and the crack is separated due to the shrunken wood. By carefully humidifying your guitar to the proper less, the crack will be open to a more “normal” size. In other words, you don’t want to glue a when the wood is extremely dry because when the guitar comes back to the optimal humidity level, the crack might close and cause a crack in your glue joint.
Once the fretboard is properly humidified, take some ebony or rosewood dust that approximately matches the color of your fretboard and spread the dust in the crack. Next, follow the same gluing procedure that we used to fill the fretboard chips. Cover the dust in super glue. I suggest using Satellite City red super glue for this job. Once the super glue is dried, I like to use 80-grit sand paper and a sanding block to remove the excess glue. Then I sand the fretboard with 120-grit, 240-grit, and 300-grit sand paper. Make sure to and all around the area evenly. You don’t want a big flat or low spot in the fretboard. Use a circular motion to sand in the general area until the glued spot is level with the rest of the fretboard. The glued crack will slowly disappear into fretboard, as you sand it!
See my guitar glue page and guitar humidity page for more info.
How to Prevent Fretboard Cracks
Now that we know how to fix acoustic guitar fretboard cracks and chips, how do we stop them from happening? That’s the easy part. Take care of your guitar! I said a few times in this article that humidity and abuse are the main reasons for guitar fretboard damage. Try to maintain your acoustic guitar right around 50% humidity and don’t throw it around. Another reason for fretboard damage is ill-trained repairman. Make sure to read my truss rod adjustment and fret repair articles before you start tearing into your guitar. Make sure you know what you are doing before you try to fix your frets and adjust your truss rod. Trust me. It will save you in the long run.
Your fretboard should look like new and your frets should be playing great! I hope this article helped repair your fretboard. Time to get back to playing your acoustic!
Repair Acoustic Guitar Inlays
I didn’t mention inlay repair in this article. It is a big problem with acoustic guitars, so I decided to write an entire article about it. Check out my acoustic guitar inlay repair article for more info.
