
As I mentioned in my Action Adjustment article, adjusting the action on an acoustic guitar take three basic steps. First, you have to check the relief in the neck and adjust the truss rod accordingly. Second, the action needs to be set at the nut. The third and final step is to set the action on the bridge. You might not think it matters what order you lower your action, but it does. Trust me. If you don’t follow these steps in order, you be spending a lot more time readjusting your setup after you “finished” it. If you have not completed the first two steps, you should go to the truss rod adjustment page or the acoustic guitar nut action page for details about the first two steps. After you have completed those steps, we are ready to lower your guitar action on the bridge and saddle, so you can get back to playing again.
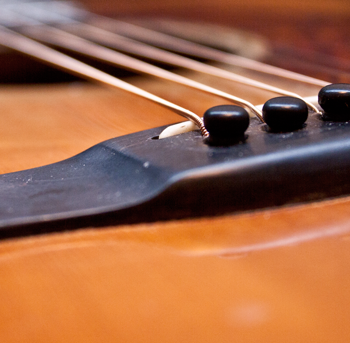
Unlike electric guitars, acoustic guitars primarily have only one bridge and saddle design. I know there are all kinds of small variations out there, but the basics are the same. The bridge is a piece of carved wood that is glued on the top of the guitar body. Most bridges are made out of some type of rosewood or ebony because the dense material is stronger and carries tone better than lighter woods. The bridge itself does not need to be adjusted to lower the action. The only thing that we are worried about is the saddle.
Guitar Saddle Repair Tools You’ll Need
Contents
Here is a list of guitar repair tools that you will need to lower the action on your acoustic guitar saddle.
Guitar String Height Ruler
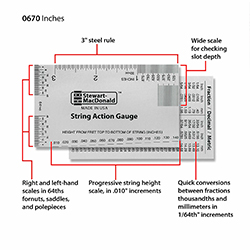 Measure twice; cut once. You have to abide by this tradesman’s law when sanding down the saddle on your guitar. You can always take more off, but you can’t put it back on and no one wants a shimmed bridge saddle. This string height ruler will give you an accurate measurement of your action, so you can lower the saddle the perfect amount.
Guitar Feeler Gauges
 This is a set of feeler gauges that will help you measure the guitar action as well as the clearance you have for your acoustic guitar saddle.
Guitar Saddle Files
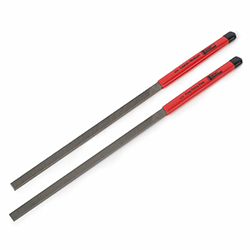 Shaping and sanding your acoustic guitar bridge saddles is precision work. You need to have a sharp set of files in order to get an accurate edge on the saddle. These files are awesome!
Guitar Bridge Saddle Slot File
 Some times the saddle itself isn’t the problem. Some times the saddle slot is uneven or has debris in it from a bad repair. This saddle slot file is the easiest way to clean out the slot and get your saddle fitting perfectly.
Guitar Saddle Vise
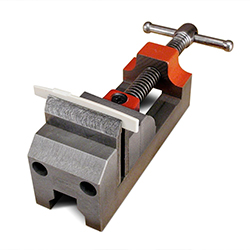 This is a specially designed vise to clamp down your saddle while you are working on it. It has tall, low profile jaws that grips the piece tightly without getting in the way of your files. This way you can sand or file at steep angles without hitting the vise. This thing is a life saver.
Guitar Nut and Saddle Sander
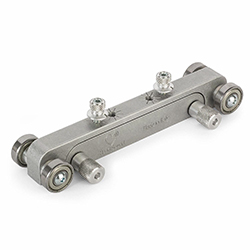 This is one of the coolest tools for lowering your guitar saddle. You simply clamp your saddle in the vise, set the height, and roll the ball bearing gig across a sheet of sand paper. After a few passes, you will have an evenly sanded guitar saddle. This makes any type of saddle adjustment really easy.
What is the Guitar Saddle?
The guitar saddle is a piece of bone or synthetic material that elevates the strings above the fretboard. An acoustic guitar’s saddle is basically a long, skinny nut that is inlayed in the bridge. They both serve the same purposes just on different ends of the guitar. The saddle not only controls the height of the guitar strings, it also controls the guitar’s intonation. Feel free to check out my article about guitar intonation for more information.
Most acoustic guitar bridges have a single saddle that sits in a channel routed in the bridge. Most beginners may not know this, but the saddle is not actually glued in place. There is no need to glue it in place because the string tension holds it firmly in the bridge. The strings are strung through the bridge in some way, either through the body or the end of the bridge, and rest on top of the saddle.
Types of Guitar Saddles
There are generally two types of guitar saddles: straight and compensated. A straight saddle is exactly what it implies. The saddle is straight across with no variations for the strings. A compensated saddle has a curved or jagged top to compensate for the string intonation. A compensated saddle helps keep the guitar in tune. If you have ever seen an electric guitar saddle, you may remember seeing the way all the individual saddle pieces are not in a straight line. This is the same concept. Feel free to check out my article about guitar intonation for more information.
To lower the action on your acoustic guitar, you will need to remove the saddle, sand it down, and replace it. It sounds a little complicated, but it is pretty easy. Let’s get started.
Steps to Lowering Acoustic Guitar Action
Measure the Action
| String | String Height |
|---|---|
| 6th string or Low E string | 3/32″ |
| 1st string or high e string | 2/32″ |
Before you do anything with this repair, you will want to measure the guitar action. Lower your acoustic saddle can take a little time if you haven’t done it before, so make sure you actually need to lower the saddle before you start. Measuring the action on your acoustic guitar bridge is easy. Simply take a ruler and measure the distance between the 12th fret and the bottom of the 1st and 6th string. Most new acoustic guitars will be set to an action of 2/32″ for the 1st string and 3/32″ for the 6th string. This is usually a good starting point. I like to lower the action to this and see how it feels. You can bring it down from here if you want. If your string height is higher than this, you will want to move to the next step.
Detune your Guitar
As you can see, the saddle is wedged in the bridge slot with the guitar strings pretty firmly. There is no way you are going to get your saddle off the guitar while all the strings are still on it. Take your string winder and detune your guitar until all the strings are floppy. DO NOT remove your strings from the tuners. Trying to rewind your strings back on the tuners is a nightmare. You are better off leaving them on the tuners and removing the strings from the bridge.
Remove the Strings
In order to remove and get access to the saddle, we will have to remove the strings. Like I said earlier, don’t take the strings off the tuners. You will want to remove your guitar strings from the bridge. If you have a standard acoustic bridge with bridge pins, you can take a string winder and pop the bridge pins out to remove the strings. Unfortunately, if you have a string-thru bridge, you will have to remove the strings from the tuners. Don’t worry though. You can still easily lower your action. It just might take a little longer.
Here’s a great time saving hint. Don’t remove all of your strings. There is no reason to remove all the strings. Remember, ever time you want to test the height of the saddle; you will have to replace the strings and retune the guitar. This can be a long process is you are removing all of the strings every time. I like to remove the bottom three strings from the bridge. This gives me enough clearance to pull the saddle out of the bridge slot with my fingers. If the saddle is extremely tight, you may need to use a pair of pliers. Just be careful not to scratch or chip your guitar saddle in the process. Grab the bass side of the saddle and slide it out of the slot.
Lower the Saddle
Now that the saddle is removed from the bridge, you can sand it down. The key to sanding down your guitar saddle is to keep it even. Much of the guitar’s tone comes from the saddle. You don’t want an uneven saddle ruining your tone. I like to take a pencil and line the edge of the saddle. Then I take a piece of double stick sand paper and stick it to my bench or a piece of wood. You can run the saddle across the sand paper until the pencil line disappears. Make sure you evenly sand the saddle. Depending on how much you need to lower your saddle, you may have to do this a few times. Always be careful while you are sanding the saddle. You don’t want to take off too much material because your strings will be too long then. Just remember, you can always take off more material, but you can’t put any back on.
Replace the Saddle
Once you have sanded the saddle down, you can replace it in the bridge slot. You may need to lift up on the first three strings in order to get the saddle to slide in the slot.
Replace the Strings and Retune
Now simply replace the bottom three strings and retune your guitar. Check the action like we did before. If you need to lower the saddle a little bit more, follow the same steps.
Remember, guitar action is left up to personal preference; everyone likes their guitars setup slightly differently. These are just industry standard measurements and settings. This action setup should get you in the ballpark of where you are comfortable. It is up to you to fine-tune your setup exactly how you want it.
Now that your guitar action is nice and low, go play it!
