
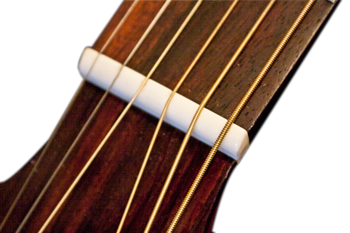
 Keep in mind that completely lowering the action on your guitar is a three-step process. Not only the nut need to be lowered, but the neck has to be straightened and the saddle must be set up. A properly set up nut is probably the most overlooked cause of high action and rightfully so. It is usually pretty obvious to beginners that their neck has excessive relief and saddle pieces are too high. A raised nut is usually a more discrete cause of high action mainly because most people judge the action of the neck around the 12th fret where the bridge action is measured.
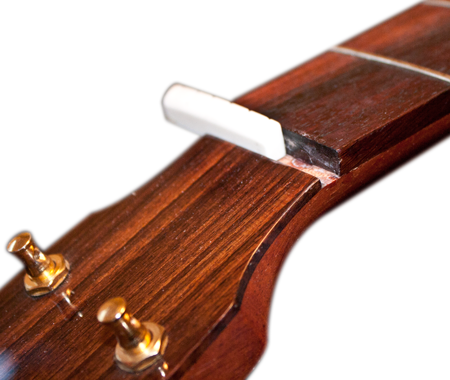
However, the action at the nut affects the guitar completely different than the action at bridge. High action at the nut is particularly bad because it will force the entire guitar to play uncomfortably. The guitar string height starts out high at the nut and continues to worsen higher on the fretboard. Like any high action problems, intonation can be affected. High action at the nut can make the guitar unable to tune at the lower frets.
Your open chords might not even sound right with an excessively high nut. Needless to say, the nut height plays an important roll in both the playability and functionality of your guitar. Let’s talk about the different tools you’ll need to lower your acoustic guitar action before we get into working on your guitar.
Guitar Repair Tools for lowering the action on an Acoustic Guitar Nut
Contents
Before we talk about the steps to lowering the action at the nut of your acoustic guitar, we should talk about the tools you need. For most nut repairs and set ups, you will need some basic tools.
String Slot Files
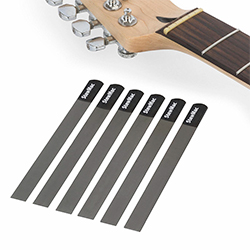 To lower the action at the nut you will need a series of nut notching files. These files are specially designed with the right measures to create the right size notches for the strings. Usually you will need three different file sizes for a standard nut.
Guitar Feeler Gauges
 You will also need a set of feeler gauges to measure the height of the string at the first fret. This is the most accurate way to see if the string slots are deep enough in the guitar nut.
Guitar Nut Seating File
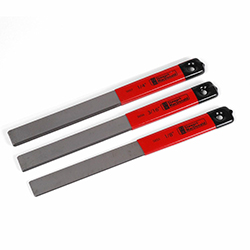 You may also need a small nut seating file that is used to file down and level out the nut slot. This file is designed to fit in the nut slot and evenly file down the seat, so the nut will sit flush and level.
Guitar String Height Ruler
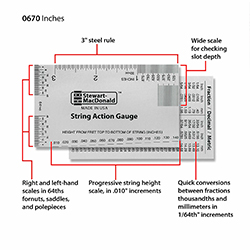 A guitar string height ruler helps you not only measure the guitar action, but it also helps you measure the string spacing and a few other key measurements in this repair. Plus, it’s handy to have for other action related repairs.
As I discussed earlier, the steps to setting your nut action will depend on the style of nut on your acoustic guitar.
Now that we have all the basics covered, let’s get to work!
How to Lower the Action on your Acoustic Guitar
Tune your guitar
First, bring your guitar up to pitch if it isn’t already.
Measure the action
Second, you will want to measure the action of the string above the fret, so you have an idea about how much of the nut needs to be filed down. Take your feeler gauges and check the height of the sixth string, lower E string, at the first fret. For beginners unfamiliar with feeler gauges, this is easy to do. Simply place the feeler gauges on top of the first fret.
Keep checking the distance between the string and the top of the fret with larger feeler gauges until you see the string move because the feeler gauge is too big to fit in the gap. Use the largest feeler gauge that does not move the string. That is the distance between your string and the fret.
Loosen the string
Third, loosen the tension on the sixth string until you can pull the string out of the nut notch. Be careful when you do this. It is easy to loosen the string just enough to pop it out of the notch and damage the nut. Since the first and sixth strings are on the edge of the nut, ripping them out of the notch can cause the outer edge of the nut to snap off.
My advice is to loosen the string enough so that is easily can be pulled out of its notch and placed on the side of the nut. Once you have done this a few times you can rest the slightly loosened string on the top of the nut, but I wouldn’t do that until you had a feel for it. You don’t want a simple nut repair to turn into a full nut replacement by breaking the edge of the nut off.
File the nut
Fourth, get the sixth string nut file out. Each string is a different diameter and needs a different size notch to sit in the nut. That is why I said earlier that you would need three different sized nut files. The special files that Steward MacDonald and Luthiers Mercantile Inc. sell are double sided. Each file has a large and small filing side. Here is a guide as to which size file you need to use with each sized string:
| String | Nut File Size |
|---|---|
| 6th string or Low E string | .060″ |
| 5th string or A string | .050″ |
| 4th string or D string | .042″ |
| 3rd string or G string | .036″ |
| 2nd string or B string | .032″ |
| 1st string or high e string | .026″ |
These are the right size nut files for traditional string gauges. If you use heavier gauge strings, you may need to use a .060″ file for both the sixth string and the fifth string. So after you loosen the string and pull it off to the side, you may want to find a thick piece of plastic or masonite to place on the headstock between the tuners to protect the headstock from being filed into. If you are careful, you will not file into the headstock, but there is no reason why you can’t take preventative measures.
Next, take the correct nut file and place it in the notch and file at the same angle as the headstock toward the headstock. This is very important. You want to make a point on the nut for the string to sit on. You do not want the notches to be filed flat. This will cause your guitar to sound like a sitar.
File your notches at angle to make a single point where the string can rest. Only file the notches a small amount at a time. Be careful not to file too much at once. You can always take more material away from the nut. It is much more difficult to add material back on the nut.
Then, replace the string, tune it, measure it, and see if you need to file it down more. The “standard” measurement at the first fret is supposed to be .030 inches. Keep filing until you bring your string down to that height.
Move on to the next string
After you have successful lowered one string to .030″ at the first fret, repeat these steps with the rest of the strings. Once you have lowered the action on all the strings, you can lower the action on the bridge. Please see the how to lower the action on my acoustic guitar bridge page for more information.
Acoustic Guitar Nut Materials
What are acoustic guitar nuts made out of?
Acoustic guitar nuts have been made out of many different materials over the past hundred years. The most traditional nuts are made out of some type of bone, but nuts can be made out of bone, ivory, tusk, wood, metal, corian, Tusq, plastic and other synthetic materials. All of these materials will work for an acoustic guitar nut, but some work better than others. A “good” nut that produces “good” tone should be made of extremely dense material. I say this in quotations because this is kind of a subjective measure.
Many people disagree on the necessity of different materials. Some of these materials are denser and better suited for nuts than others. One big debate today is the Tusq style nuts and their comparability to bone nuts. Tusq is a manmade substitute that has the same density as bone without its inconsistencies. I have found success with both of these nuts and think it comes down to personal preference.
It is important to know what kind of material your nut is made out of when you are planning to work on it. Each one of these materials is slightly different to work with. You will not need to add any material back on if all you are doing is lowering the action at the nut; however, in other repairs, it may be necessary to add material in order to raise the nut. You will want to match whatever material you are adding with the existing nut material.
Acoustic Nuts
Most acoustic guitars made today have synthetic nuts like corian or Tusq, but older and more custom acoustic guitars often have nuts made out of bone or other materials. Acoustic guitar nuts are traditionally made out of a solid piece of material that is glued into the neck and butted up against the edge of the fretboard. The nut itself is glued to the neck–not the fretboard. These nuts are fitted to the neck and then glued in place.
All kinds of different glue have been used to glue nuts in place. Some builders use super glue while other use wood glue. Realistically, it doesn’t matter what type of glue you use as long as the nut can be removed at a later date. Once the nut is glued to the neck, it can be shaped and notched for strings. Soon I will be writing a how to build and replace an acoustic guitar nut article. Stay tuned for more details!

very clearly explained thank you
Glad I read this before filing or I would have filed the slots flat instead of to a point. Thanks.
“The standard measurement is supposed to be .030”. Where do you measure that? A picture or diagram would definitely help.
This is all great, but everyone references off the height of the first and other frets. What if the first fret is too short or tall? What I need is a rock solid nut height for each fret, and adjust the nut accordingly. Assuming The neck was straight. I’m an engineer and need facts, not a reference based on what someone else has built correctly or incorrectly. The set up at the nut and frets should be predictable and repeatable. It’s true that wood moves, and there’s tremendous stress on a stringed instrument’s neck. But how about a set of standards that we can start with, and go from there?
Can I sand the bottom of the nut like I would the saddle? I got it off pretty easily with no damage at all.
Filing each slot individually seems to me more like a “fine tune” step that may not be required if it could be done like the saddle. I’m setting up a new beginner right hand acoustic guitar for my 10 yr old LEFT handed nephew and I AM switching it over to a lefty. Strings are tough for me to fret and much worse for him. Action is WAY too high. Any thoughts would be appreciated.
I have just joined your site and was intrigued that you don’t mention lowering the nut by sanding the bottom thus eliminating the high cost of individual files and expertise needed to file each slot well. If the nut has the slots already set up for the gauge of string you use wouldn’t this be a simpler solution?