
What is Acoustic Guitar Body Binding?
Contents
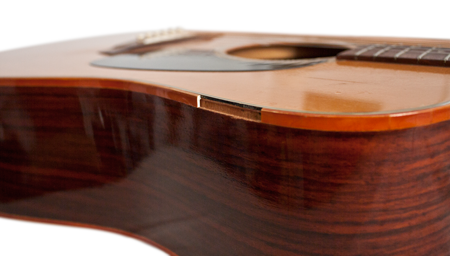
Almost all acoustic guitars have some type of binding around the edges where the top and back meet the sides. Many acoustic guitars also have binding around the fretboard and peghead. Acoustic guitar binding can be made out of many different kinds of material including: various woods, plastic, or celluloid.
A “true” binding around the body of the guitar is inlayed or glued in a channel cut from the body. A router is used to cut a small channel or shelf on the edges of the guitar for the binding to sit on. The binding is then bent and shaped to fit the body and glued in place. Most of the time decretory purfling strips are usually inlayed next to the binding. Purfling strips are thin laminate pieces of wood dyed different colors.
You might ask, what is the purpose of binding on an acoustic guitar and why don’t all guitars have binding. Acoustic guitars have the edges bound to create stronger joints between the top, sides, and back of the guitar. The binding acts almost as a brace around the outside of the guitar.
It protects the fragile, grain edges of the top and back while helping attach them to the sides. Binding is important structurally and aesthetically. Your choice of binding can change the entire look of your guitar. Pearloid or celluloid binding will give the guitar a completely different look than wood binding. Solid binding also helps produce good tone.
Common Problems with Acoustic Guitar Binding
The most common problem with acoustic guitar binding is loosening or cracking. Binding can come loose or crack for a variety of reasons–the most common two being weather conditions and abuse. When your guitar is in an environment with very little humidity, the wood will shrink as the wood dries. Since most binding on acoustic guitars is made out of celluloid or plastic, the binding shrinks at a different rate than the body. Celluloid binding, in particular, can shrink and come loose from the body.
If your binding is cracked, it is important to have this problem dealt with immediately. The loose binding can snag on something and rip it even farther cracking the finish in the process. If you have loose or cracked binding, you should be very careful not to catch it on something and make your problem even worse. Ideally you should get it fixed right away, but sometimes that isn’t possible. You should tape the end of the loose binding down with some scotch tape until you get it fixed. The tape shouldn’t hurt your finish if it’s not on there for extended periods of time. This will prevent you from snagging the loose binding and tearing it off your guitar.
How to fix Loose Acoustic Guitar Binding
I cannot stress this point enough. Guitar binding is a tricky and technical repair. Do not try to read this article and perform this repair on your nice guitar for the first time. My advice to a beginner is to buy a cheap guitar and practice on that. Once you have some experience, you can try it on your nice guitar. Otherwise, take the guitar to a professional. You do not want to have a botched binding repair on your guitar.
Now that I have warned you, let’s start the repair. There are several ways to fix loose binding depending on how bad the problem is.
Loose Binding Toward the Bout
If the binding is loose toward the bout of the guitar, you may be able to clean the binding slots, reshape the binding, and re-glue the binding.
Clean the Binding Channel
To clean the binding channel, simply take a small file or razor blade and file or scrape away the glue that is left in the channel until only clean wood remains.
Heat and Bend the Binding Back in Place
Once the channel is clean, you can take a heat gun and slowly heat the binding. Be careful. Celluloid binding is flammable; it may catch on fire if you are not careful. Then carefully bend the binding back in place. If you are bending wood binding, you will need to wet the wood down before trying to bend it. The water will be heated and turn into steam. The steam will make the wood more malleable and less brittle.
Glue and tape the Binding
Now that the binding is bent back in the correct shape, you can glue it in place. If you are gluing plastic binding, I would use Satellite Super glue. DO NOT use acetone based glues, as they can cause problems with clean up and the finish on the binding. If you are gluing wood binding, I would use Tite-bond. You can read more about different glue types on the glue page.
Drop a line of glue in the channel. Do not get carried away. It does not take a ton of glue and you don’t want a huge mess on your hands after the binding is glued on. Once you have the glue in the channel, carefully bend the binding to the guitar and tape it in place with painter’s tape. Make sure to research what tape you are using and what kind of finish your guitar has. The adhesive on the tape can ruin your guitar’s finish. Let the glue dry.
Scrape the Binding
Now that the glue is dried, you can peel the tape off. Be careful peeling the tape because you do not want the finish to come off with the tape. After all the tape is off the body, you can take a razor blade and scrape the excess glue off of the binding.
If you replaced the binding with a new piece of binding, you will also need to scrape or file down the binding itself until it sits flush in the channel. Make sure you are careful when you scrape the binding. You do not want to scrape any of the finish off of the body of the guitar. If there is a gap left at the joint on the bout, you may need to fill it with a small piece of binding.
Spray the Finish
Now that the binding is glued in place, cleaned, and scraped flush with the body, you might need to spray a tint of yellow or some color on the binding to make it match the original binding. After the color is added, you can spray the clear finish, wet sand, and polish. It should look good as new.
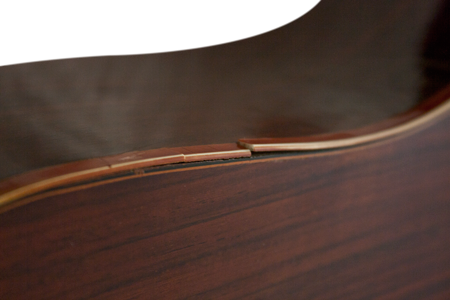
Loose Binding in the Guitar Waist
Although it is not a common problem, binding can shrink and come loose in the waist of the guitar. If the binding is not too far away from the body, you may be able to clean the excess glue in the binding slots with a file or razor blade, heat the binding up with a heat gun, and carefully bend it back to the body just like we discussed in the previous section.
However, the binding will only be able to bend and stretch so far. You may have to remove the binding up to the joint. To understand what the joint is and how binding is installed, see the installing binding page.
How to Remove Loose Binding
In order to re-glue the binding at the waist, you may have to remove the binding all the way up to the joint. This way you can stretch and reshape the binding as much as possible and fill the remaining area at the joint. You will not have to cut the binding and make a new joint in the waist.
First, score the edges of the binding with a razor blade or X-acto knife. You want to make a cut into the finish of the guitar on the edges of the binding. If you pull the binding off, you will crack and pull the finish off as well. Scoring the finish will help prevent it from breaking.
Second, VERY carefully take a putty knife and wedge it in between the binding and the guitar. Wiggle it back and forth and work you way around the guitar. Watch for tears in the finish and go slowly. This is a time consuming repair if you want to do it properly.
Once you have the binding peeled off the guitar down to the joint, you can follow the steps in the Loose Binding Toward the Bout section to complete this repair.
Again, I have to warn you. This is a technical repair that requires experience and patience. If you have neither of these virtues, I suggest you practice on cheap guitars or take your guitar somewhere to have it repaired.

Hi, I have a acoustic 12-string guitar, dreadnought. So the binding on my guitar was damaged while I was removing the broken, cracked top side of the guitar, I was planning on saving the binding I took off but someone of my family had thrown it away, what should I do now? Please help me out.
My recommendation is to find a local guitar repair shop in your area and take it in for an estimate. You’ll be told what they will need to do to repair it. Plastic binding itself isn’t expensive, but the cost will more reflect the time necessary to complete the job. All things considered, you might choose to do the repair yourself if you have the tools and aptitude. There are videos on YouTube that show how to do almost anything (except surgery) so make an informed decision. If the guitar is expensive and a name brand, don’t chance ruining the value by doing an amateur repair. Good Luck!
You have shared the article what I was exactly looking for. I am not a professional in guitar repairing. I am just learning guitar. Though I have fixed some issues my own. I have installed guitar tuner buttons by following instructions from articles. Now I need to do the body binding, as I purchased a second hand guitar. Thanks for the tips.
I have an old acoustic guitar and currently it needs repairing. Recently I have replaced the guitar tuner buttons and it is working fine. But it requires binding around the edge of the guitar body. Before reading this blog I have no idea how to do it by myself but now I am very confident that I can do it. I will use celluloid for this purpose and hope it will work.