
Contents
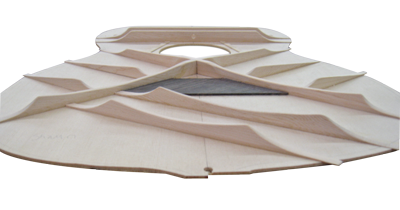
Acoustic guitar bodies are made out of extremely thin wood, usually between .080″ and .125″ thick. This thickness wood has nowhere near the amount of strength required to hold up against the constant string tension and pressure.
This is why the inside of acoustic guitars has braces running across the top and back. Some acoustics even have small braces on the sides of the body. These braces help reinforce the guitar body as well as transfer the tone from the key areas.
Guitar Brace Repair Tools You’ll Need
Sound Hole C-Clamps
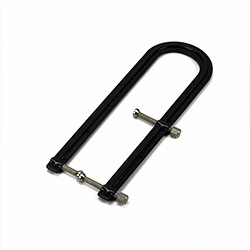 In order to fix any type of loose or broken guitar brace, you will need a c-clamp that is long enough to fit in the sound hole and reach the brace that needs to be repair. Here are several different sizes of sound hole c-clamps that will get the job done right.
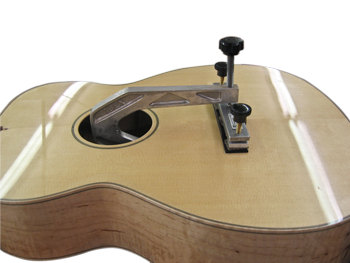
Guitar Bridge Clamp
 A guitar bridge clamp is used to either glue the bridge in place or repair the bridge plate on the inside of the guitar. This unique clamp slips in the sound hole and attaches to the bridge clamping caul to securely hold the bridge in place during the gluing process.
Guitar Bridge Clamping Caul
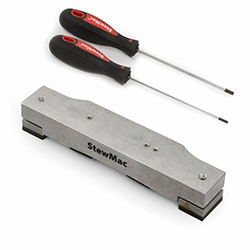 This clamping fixture fits in the bridge clamp to hold the bridge in place while you glue it back together or do any other type of bridge/brace repair.
Now that you know what types of tools you’ll need to do basic guitar brace and bridge repair work, let’s look at how to fix them.
Different Acoustic Guitar Brace Designs
It is important to know the different styles of braces as well as the different brace patterns in order to proper locate and fix your braces. Since guitar brace design is kind of a lengthy topic, I wrote an entire article about it. Check out the acoustic guitar brace pattern page for more info.
Symptoms of Loose or Cracked Guitar Braces
Problems with guitar braces can persist for a long time before you actually detect what is wrong with your guitar. There are many different signs to look for when you are diagnosing your acoustic guitar brace problem. These are just a few of the most common ones.
Internal Rattling
There are many different signs of loose or cracked acoustic guitar braces, but the most obvious sign is internal rattling. Most of the time when brace comes loose or gets cracked it will tend to rattle against the guitar body as you play it. Don’t mistake this rattling for string buzzing. The easiest way to tell if the rattling is coming from your strings or the body is to play all the strings from every position on the fretboard. If the rattling is constant and consistent, it is usually coming from inside the guitar.
Cracks and Bumps
Since the braces help support the guitar body, a loose or broken brace can cause damage to the body. Many times the body will develop a bump or dip in the top or sides because the brace isn’t glued on properly to support it. A common place for bumps is right behind the bridge. Cracks can also develop in the finish or even in the wood itself. It is important to catch brace problems early, so it doesn’t result in major damage to your guitar.
Finding Loose and Cracked Acoustic Guitar Braces
Now that we have diagnosed the problem, we need to find out which brace is loose. Before we do any poking around inside the guitar, the strings will have to be removed. Detune the guitar and remove the strings, so they aren’t in the way.
Trying to see anything inside of an acoustic guitar can be challenging if you don’t have the right tools. I like to use an automotive repair style mirror on an adjustable length handle. Some of these mirrors even have lights on them. The adjustable length handle will allow you to stick the mirror into the body to examine the braces. If your guitar has a bump/bulge on the top or rattles when you play it, check the braces directly under that area. These braces might be loose or not completely glued to the body. Carefully examine all the braces in the area. Loose braces can be difficult to spot because the gap between the brace and the guitar top might be extremely small.
If you can’t see any gaps in between the braces and the body, don’t rule out the possibility of loose braces. This just means you can’t see them. Now comes the difficult part. If you can’t visibly see loose braces, you will need to physically check each brace. The easiest way to check your acoustic guitar braces is to run a thin feeler gauge against the bottom of the braces. If there is a gap, the feeler gauge should be able to fit in between the brace and the guitar body. Check all of the braces with a feeler gauge. It is important to run the feeler gauge all the way out to the end of each brace, as many braces come loose toward the ends. If you check all the braces and none have gaps, your guitar might have cracked braces.
Cracked braces can be extremely difficult to find. Some hairline cracks are not easily detectable without actually pushing on the braces. You will need to examine each brace carefully for cracks. If you guitar is rattling, you might also have a problem with the bridge plate.
How to Glue Loose and Cracked Guitar Braces
 After you have found the cracked or loose brace, it is time to fix it. Working through the sound hole of your guitar is difficult and requires a special set of clamps, cauls, and jacks. A deep c-clamp is used to glue loose braces on the top of the guitar. These clamps look exactly like a traditional c-clamp but with an extremely deep throat.
Since it is almost impossible to use a traditional clamp on the braces on the back of the guitar, you can use a jack. These jacks are very similar to car jacks. These usually consist of two pieces of wood separated by a screw. When the screw/wood is turned, the two pieces of wood get farther apart.
I usually end up making custom cauls for most of my repairs. A caul is simply a piece of wood that is used for clamping. Usually you will have to make a special caul for the brace you are gluing in order to clamp it properly. Now that you are stocked up on tools, let’s get to work.
Clean the Brace
First, you need to clean the brace. If your guitar is like most others, the inside will be dusty and dirty. Your braces will also have remnants of the old glue. You will need to clean the dust and old glue particles off your brace. I like to use some sand paper. Depending on the brace, 180-grit usually works well. Just be careful while you are sanding. You don’t want to reshape your guitar brace. After you have cleaned the brace, it’s ready for glue.
Dry Run
Whenever you are gluing up a guitar, you should always test out your clamping positions before you actually put glue on the guitar. Many times your cauls or clamping plans don’t work out as well as you thought they were going to. Clamp up the brace before you actually put glue on it. Trust me. It’s a lot safer this way.
If you are gluing a brace on the top of the guitar, you can make a special caul to fit over the brace. You may also want a padded caul for the outside of the guitar. That way you don’t scratch it. Now take your caul and tape it to the deep c-clamp. This way you won’t loose the caul in the body. I like to use double stick tape. Now carefully slide one half of the clamp in the body and line it up with the broken brace. Once you have the clamp in place, tighten the clamp.
You will do the same thing for loose braces on the back of the guitar only with a jack rather than a clamp.
If you don’t run into any problems with the dry run, it’s time to break out the glue!
Glue the Brace
For gluing most braces, I like to use Titebond wood glue. Do NOT use super glue to guitar braces. You might eventually have to remove the guitar braces for some reason in the future. Super glue is nearly impossible to remove. Trust me. Stick with the wood glue. If you are restoring a vintage guitar, you may need to use hide glue.
You are probably wondering at this point how you are going to get the glue in there. You can’t just stick the glue bottle in the sound hole. It would make a mess. The best way that I have found to re-glue acoustic guitar braces is to drop some glue on your finger. Use your finger to work the glue in the crack or gap of the brace. If you can’t get the glue in the crack, use a feeler gauge to work the glue in place. You don’t need a ton of glue in order to get a solid joint. It just needs to actually be in the gap.
Clamp the Brace
Once the glue is working into the brace, get the clamps and clamp it down. This should be same exact proceed as the dry run. While you are tightening the clamp, use a flashlight to check the brace. You should stop tightening your clamp once you start to see the glue squeezing out of the brace.
Wipe Excess Glue
This might be impossible or impractical to do, but I try to do it anyway. Whenever you are gluing something on a guitar, always try to wipe off the excess glue. It makes the joint look cleaner and makes it easier to clean when the glue is dry. I usually use a damp rag or paper towel on the end of a long pair of tweezers to wipe the glue off of acoustic guitar braces while they are clamped up. You can use any type of extension that works for you.
Remove the Clamps
That’s it! That’s all there is to it. This glue will dry in a couple hours, but I like to leave my guitars clamped up over night. That way I know nothing will move on in it. You can remove the clamps after the glue is dry. Just be careful while you are removing the clamps. It is very easy to dent the guitar with your clamps and cauls. Now that your brace is all fixed, it’s time to play your guitar again.
