
Your acoustic guitar’s finish can have all kinds of problems, as you play it over the years. Use and abuse of the instrument as well as the weather conditions ruin acoustic guitar finish. Unfortunately, unless you are going to keep your favorite Martin or Taylor in a vault, you will probably scratch or dent your guitar at some point. In this article, I’ll explain a few different guitar finish problems as well as a few ways to repair small finish blemishes.
Warning: Before we go on to learn about finish repairs, I urge you to think twice before experimenting with your guitar’s finish. Finish can be a tricky thing. In most cases, if you are not experienced, you will probably make the finish problem either worse or more noticeable. Do not practice on your prized guitar. Get experience on a $10 yard sale guitar. Then work on your real guitar.
Also, if you have a vintage guitar, I would suggest that you not tamper with the finish at all. A vintage guitar’s value will decrease drastically once it has been refinished. Trust me; in almost all cases, the vintage guitar will be worth more even with scratches and dents then with a new coat of finish. That being said, let’s repair your finish.
What can happen to Acoustic Guitar Finish?
Contents
Lacquer Cracks
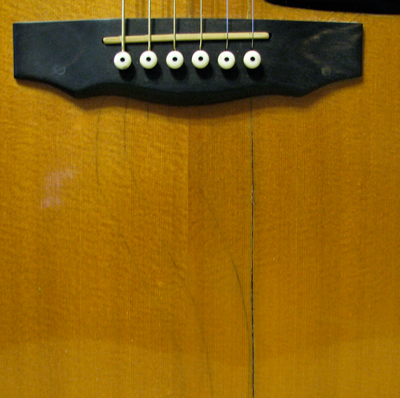
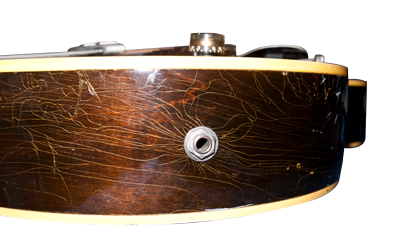 Lacquer cracks are generally caused by drastic changes in temperature or humidity. The lacquer is attached to the outside of the wood. While the wood can expand and contract with differing amounts of humidity in the air, the lacquer, for all practical purposes, cannot. This is the major reason behind lacquer cracks–the wood moves while the lacquer remains still. Most lacquer cracks start out small and internal, often called crazing or checking. These cracks look like hairline cracks, but cannot be felt when you run your finger across the top of the finish. The reason why the cracks feel smooth on the outside of the guitar is because the lacquer is cracking from the inside out. It’s cracking where it joins the wood. Some of these cracks will never materialize into an external crack, where as, others will. It just depends on how well you take care of your guitar.
Many vintage instruments have this sort of cracking, due to their age. If your vintage guitar has finish problems, think twice before you have it refinished. Refinishing a vintage guitar will decrease its value.
How to Repair Lacquer Cracks
You might think that these small cracks would be easy to get rid of. Couldn’t you just sand them down and buff the guitar out again? Unfortunately, the answer to that is no. Remember, these cracks are caused by the guitar wood itself and crack from the inside out. You can’t simply sand a little into the clear coat to get rid of them. Some of these small hairline cracks exist all the way down to the guitar wood itself. You would have to completely sand down the entire guitar to remove these cracks. Not only is this not worth the effort, it might be impossible if your guitar has any stain or burst on it.
Guitar lacquer is applied to the guitar after the color is sprayed or rubbed on. It would be nearly impossible to sand through the clear coat and leave the color completely intact. You will inevitably sand through some of the color and leave your finish with an uneven burst. This is a beginner mistake. Just don’t try it.
How to Prevent Lacquer Cracks
 Since severe weather is what causes most lacquer cracks, preventing them is pretty easy. All you have to do is make sure your guitar’s environment right. Don’t let your guitar be exposed to drastic temperature and humidity changes. Don’t leave your guitar in a hot car in the summer or a cold car in the winter. And always, ALWAYS make sure to let your guitar acclimate itself to the conditions before you take it out and play it. When you play a winter gig and your guitar has to sit out in the cold car for a few hours, make sure to bring it inside a few hours before you open the case. This will give your Taylor or Martin a chance to thaw and acclimate itself to the new environment before going through the stress of being played. If you can manage all of that, you should have a difficult time getting lacquer cracks.
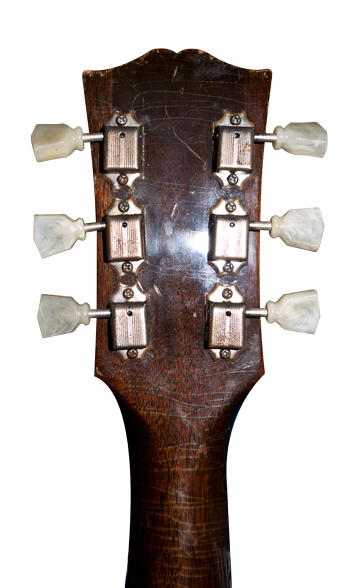
The guitar to the right is an extreme example of what can happen to your guitar if you leave it in a icy car and play it as soon as you bring it inside. It can start with a finish crack or completely crack the guitar top. Keep your guitar away from extreme weather changes.
Check out my acoustic guitar maintenance article for more info about proper humidity and temperature levels.
Scratches in your Guitar’s Finish
It is impossible to prevent your guitar from getting scratched up, so why even try? I’m just kidding. No one really wants their prized guitar to get all scratched up. Unlike lacquer cracks, finish scratches are caused by rubbing something on the outside of the guitar. These scratches usually only exist in the clear coat of the guitar. Although there is no real way to prevent getting scratches on your guitar other than never playing it outside of your living room, there are some ways of removing them.
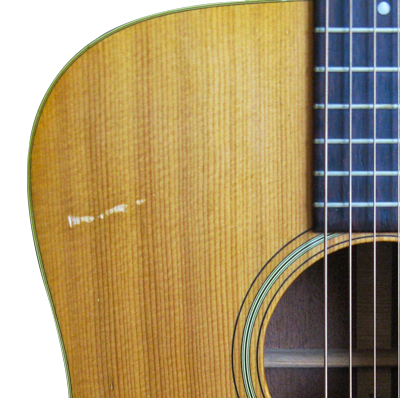
Shallow scratches can be removed or buffed out of the finish in your guitar if you know how to do it. Deep scratches on the other hand, cannot be removed and will cause a bigger problem if you they to buff them out. Shallow scratches can be wet sanded, buffed, and polished again. These scratches look like small hairline scratches on the outside finish of your guitar.
To fix your guitar scratches, you can wet down a piece of 1,000-grit sandpaper with water and soap suds and lightly sand down the area with the scratch. Keep in mind, you only want to sand down a little of the topcoat of lacquer–nothing more. I usually start at 1,000-grit and work my way up to 12,000-grit sandpaper. Then take a buffing wheel or rag and work in some buffing compound. After the area has been buffed, you can polish it to a high shine. Keep in mind, if you are using a buffing wheel, you really only have to sand up to 2,000-grit. There is no need to go past that.
Once your guitar is polished, you shouldn’t be able to see any hairline scratches.
Deep scratches are scratches that you can feel with your fingertips or fingernail. These kinds of scratches are near impossible to sand out. They are too deep in the finish. If you go after a deep scratch with sandpaper, you will probably sand through the topcoat and into the color coats or raw wood like we talked about earlier. In this case, the guitar may need to be refinished to hide your sand through. Deep scratches are better left alone or brought to a professional. Do not try to fill these scratches with extra lacquer or other filler. Trust me. It will probably look worse than if you would have just left it alone.
Bubbled Guitar Finish
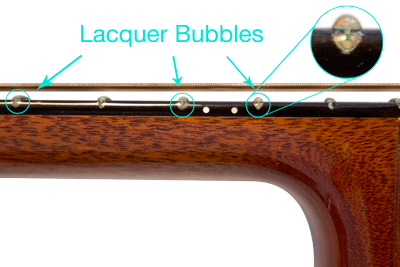 I just call this bubbled guitar finish. The finish doesn’t actually pop out like a bubble. It just looks like there is a bubble in the finish itself. This usually happens because the wood or materials under the finish shifted after the finish hardened. This commonly happens on the side of the unbound fretboards with finished necks. The shrinking of the guitar neck and fretboard try to pull the lacquer in as the wood shrinks. The frets, however, don’t shrink and cause the finish to crack or bubble and even crack. Usually bubbling is an early sign that a finish crack is coming soon. The easiest way to prevent these issues is the same as lacquer cracks. Take care of your guitar and try to keep the weather conditions consistent.
De-laminated Guitar Finish
This is not a very common event, but it does happen. Since the lacquer is sprayed on top of a clear coat or sealer coat, the lacquer is not actually attached to the wood of the guitar–the sealer coat is. This finish problem is most likely caused by a poor finish job. The topcoat is probably not sticking to the sealer coat. To fix this problem, you will need to strip the finish off the guitar and refinish it again. If you just spray more lacquer on top of the de-laminated finish, you will end up having the same problem later on. The problem is in the base coat–not the topcoat.
Yellowing Guitar Finish
Some guitar finishes like Nitrocellulous lacquer naturally yellow over time. This is a completely natural and completely unpreventable process. I talk more about this in my guitar finish article. Check it out.
Drop Filling Acoustic Guitar Dents or Chips
 Unlike acoustic guitar scratches, guitar dents and chips are small in area and don’t sweep across the guitar body. In other words, you can easily fill them and not worry too much about ending up with inconsistent finishes across your guitar. Obviously, the guitar to the right is an extreme example with multiple chips in a row, but it is a good example. Here’s how to drop fill your acoustic guitar dents and chips.
Color the chip
Some acoustic guitars have a color stain or color burst around them. Some dents and chips take the color with when they are ripped out of the guitar. Before you put any finish on the guitar, you will want to make sure the color looks right. I like to put a small amount of acetone in a plastic cup and drop a few drops of color stain in it. This should mix up nicely.
Now you can dip a toothpick in the color mix and apply it to the chip in the guitar. The color mix should disperse over the dent. All you need is a couple drops of the color mixture. You can dab up the excess with a paper towel and let it dry.
Apply the Finish
Once the color stain is dried, you can put some finish on it. You can use almost anything from polyurethane, lacquer, epoxy, or super glue. All of these will work, but some take longer to dry and harden. Poly and lacquer could take as much as a day to dry. Epoxy and super glue dry much faster. I usually use super glue because it’s the easiest and fastest to use.
Drop a few drops of your finish on the colored chip. Make sure to get enough on there, so the drops of finish are higher than the old guitar finish. You basically want a bubble of super glue or other finish on top of the chip. Now just let that dry. You might have to do this a couple times to let the glue or finish build up. Make sure you do not use an accelerator to speed up the drying process for epoxy or super glue. Accelerators cause a chemical reaction that releases heat. You could bubble or ruin the surrounding finish this way.
Scrape off the Finish
Now that you have a large bubble of hardened finish on your guitar, you’ll need to scrape it off. The easiest way to do this is with a razor blade. This technique was popularized by Frank Ford. Take a razor blade and scrape it against a piece of metal until you get a nice sharp burr on one side of it. Then tape off the outer edges of the razor with regular, clear scotch tape, so the only part of the blade showing is a middle portion a little bigger than the size of your chip.
The next part is really cool. Place the razor flat against the guitar and run the un-taped blade against the bubble of finish. The burr on the razor blade will peel off the excess finish on the chip and the tape will protect the body from the rest of the razor blade. Lightly scrape the finish off until no more will come off with the razor. Notice the tape on the razor prevents it from scraping the spot flat against the rest of the guitar finish. You’ll need to hit the rest of this spot with sandpaper.
Sand the Excess Smooth
Sanding a small spot like this can be really tricky. You don’t want to go at it will a sanding block right away because you don’t want to sand down all the surrounding areas with course sandpaper. You should strip sand the chipped spot.
Strip sanding is pretty easy. Cut a piece of sandpaper into a 6 inch by .25 inch piece. Then place the sandpaper on the chipped area and press down with your index finger. Now pull the sandpaper with your order hand. This way the only part of the guitar that gets sanded is the chip and the chipped area.
When you strip sand the chip, you will want to sand in all different directions. Don’t keep sanding in the same direction. You’ll scratch marks in the finish that won’t buff out completely. Keep changing sanding directions. I like to start strip sanding with 400-grit sandpaper and work my way up to 1,000-grit.
After I have the chip strip sanded to 1,000-grit, I break out a sanding block and wet sand the spot with 2,000-grit sandpaper. If you use an actual sanding block, make sure to fully attach the sandpaper. I usually use a 1 square inch piece or rubber or hard foam that I double stick sandpaper to. Don’t fold the sandpaper over the edges of your block. You will get sand marks from the outside edges of the sandpaper. I like to use the sandpaper that has a sticky backing. That way I don’t have to bother with using double stick tape.
Wet sand the area with 2,000-grit sandpaper in a circular motion. Make sure to get the surrounding areas too–not just the chip. You want to work everything in. I usually wet sand all the way up to 12,000-grit sandpaper. Again, you don’t have to sand this high up if you are using a buffing wheel. 2,000-grit sandpaper would be sufficient.
Buff and Polish
Now all you have to do is take a rag with some buffing compound and buff the section. You can also use a buffing wheel. After everything is buffed out, grab a little cleaner and clean the rest of the guitar.
Your acoustic guitar should be looking great now! The cracks are buffed and the chips are filled. I hope this article helped you fix your guitar finish and get your guitar looking awesome. Now it’s time to play it. Just be careful not to get another scratch or dent.

Thanks! Works great! I did the drop fill with superglue. Worked like a charm!
How can you fix a smudge in the lacquer finish of an acoustic caused by contact with insect repellent?
Very interesting tips, thanks. What is not clear to me, as I want to repair chips, is where/how I get the color powder(?) to mix with the acetone.
What kind of finishes were used in the 50s60s Harmony Silvertone guitars and mandolins. Or information references
I have a Fender Sonoran natural finish that someone had applied stickers to the top years ago. I removed stickers and it left fading all over top of guitar. Is there any way to correct or at least blend in the colors?
I think there is a ‘tipping’ point at which one must decide to do anything at all regarding minor dings and dents that don’t break the varnish surface. I have a brand new beautiful Alvarez Yairi Mastworks series and I have already blessed it with two very minor dings from my music stand. If I direct someone’s attention about eight inches or less from the guitar surface and point right at them, they’re barely noticeable. The guitar was manufactured in Spring of ’19, and delivered to me a week ago. it being all-wood, I have just started storing it in its case with its soundhole humidifier. I have a suspicion that as the wood absorbs some moisture, these two little marks might just swell back to near normal, after which some guitar cleaner and polish will refine any remaining mark. I probably haven’t crossed the tipping point of breaking out sandpaper and varnish. 🙂