
Contents
Before we adjust the truss rod, we should take a look at what a truss rod is. A truss rod, essentially, is a metal rod that is inserted into a channel or cavity in the neck to help with support and straightness. Truss rods stiffen the neck and help eliminate relief and back-bow in the neck. There have been many different styles of truss rods since they were first invented. The early truss rods were not adjustable.
Early Martin guitars had a variety of non-adjustable truss rods. These truss rods were often a T-bar or piece of square tubing simply glued into the neck. The primary purpose for these truss rods was to stabilize the neck and keep it from bowing. If the neck did bow because of extreme weather conditions or faulty craftsmanship, there was nothing you could do to fix the neck short of tearing it apart, straightening the neck, and inserting a new truss rod. Martin used these non-adjustable truss rods up until 1984. For more information about the history of Martin guitar truss rods, please visit the Martin truss rod page. “Modern” truss rods are adjustable. This means they not only help reinforce the neck but also help bend the neck back into a straight position.
Today, almost all guitars are fitted with adjustable truss rods. Adjustable truss rods can be adjusted using an allen wrench, screw driver, or nut driver in either the headstock or the heel of the neck. Acoustic guitar truss rods come in two main styles: single action or one-way truss rods and dual action or two-way truss rods.
In short, single action truss rods bend the neck one way by tightening the truss rod. Loosening a single action truss will not “bend” the neck in the other direction; it simply relieves the pressure from the truss rod and allows the string tension to bend the neck in the opposite direction.
A dual action truss rod, on the other hand, does bend the neck in both directions. Tightening or loosening a dual action truss rod will bend cause the truss rod to bend in either direction. For more detailed information about how truss rods work, please visit the truss rod page.
Acoustic Guitar Truss Rod Adjustment Tools You’ll Need
Here are a few guitar repair tools that you will need in order to properly adjust your truss rod and measure it to make sure it’s completely straight.
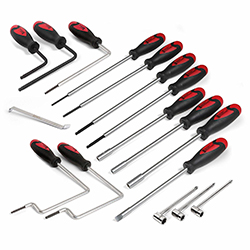
Truss Rod Wrenches
 Most acoustic guitars have a truss rod with a nut in the peghead or headstock. These can easily be adjusted with these special wrenches. They are designed to fit in the slot and not get stuck like a standard nut driver would.
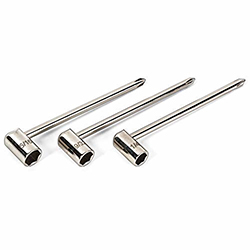
Truss Rod Wrench Set
 Not all acoustic guitars have easy access to the truss rod through the headstock. Some have access at the base of the neck. For these guitars you will need a special wrench that can reach inside the sound hole and up to the neck. Here is a set of what you will need for these types of guitars.
Notched Straight Edge
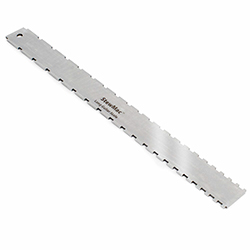 When you are straightening your guitar neck, you need to measure it to see how far off it is. A normal straight edge will sit on the frets and will most likely give you a false measurement because the frets can be slightly unlevel. A notched straight edge has cut outs for the frets, so you get a true reading of the neck straightness.
Guitar String Feeler Gauges
 Another useful tool to have when straightening your guitar neck is a set of feeler gauges. These are used to measure the distance between the string and the tops of the frets. You can also use them for many other setups and repairs.
Steps for adjusting the Truss Rod in your Acoustic Guitar
Step 1: Check the relief or back-bow in the your guitar neck
Steps for checking the straightness of your guitar neck are the same for both acoustic and electric guitars.
With a straight edge
Checking the straightness of your neck is relatively simple if you have a straight edge or a notched straight edge. Simply play the straight edge against your frets or fretboard and shine light behind it. If the neck is not straight, light will shine through the gaps.
Without a straight edge
If you do not have a straight edge, you can simply use your strings as a straight edge. Press down the string at the first fret and press down the string on the fret where the body and neck meet. The string will become a straight line between the two frets. You may want to use capos to hold the string down. Once the string is fretted on two frets, you can measure the distance between the frets and the string with feeler gauges. If there is relief in the neck, the 6th or 7th fret will have the most distance between the string and the fret. The distance between the string and frets will decrease the closer you get to the capoed frets. The opposite will be true if the neck has back-bow. If the distance between all the frets and the string are equal, the neck is straight and does not need to be adjusted.
Remember as I wrote on the action adjustment page, there is no right or wrong amount of relief in your neck to an extent. Usually a slight amount of relief is appropriate. Just like anything else in adjusting guitars, neck relief is a player’s preference. It depends on the style of instrument and player. You should try to adjust your truss rod until your neck is flat and play it. Then you can continue to add a slight amount of relief until the neck feels comfortable. Since the neck changes with the seasons, this adjustment will be fairly often. You will get used to how much relief you prefer in your neck. The average relief at the 7th fret is about .007 inches.
Step 2: Adjusting the Truss rod
Before we adjust the truss rod I want to warn you. BE VERY CAREFUL. Do not over tighten the truss rod. Remember the truss rod is a piece of metal that we are applying pressure to in order to bend it and the neck. If you over tighten the truss, you can cause any number of problems. You could snap the truss rod, warp the fretboard, or twist the neck. All of these problems are rather involved and expensive repairs. It is best just to be careful and not over tighten the truss rod in the first place.
A good thing to do before following the steps below is to loosen your truss rod a full turn and measure the neck to see what happens. If the truss rod is already all the way tightened and the neck still has relief in it, you may break something by continuing to tighten the truss rod beyond its limits.
There are two basic styles of acoustic guitar truss rod access points: in the headstock or peghead and in the heel. Here are the steps to adjusting both of these truss rod setups.
Different Styles of Acoustic Guitar Truss Rods.
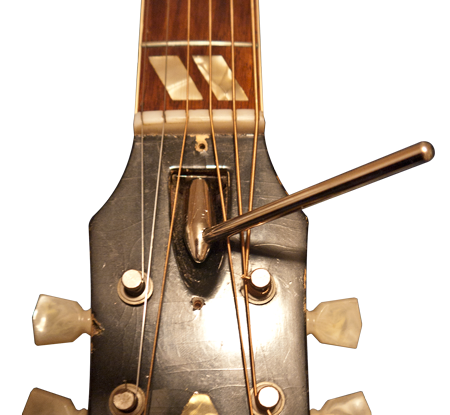
How to adjust an Acoustic Guitar Truss Rod through the Sound Hole
Many acoustic guitars’ truss rods are only accessible in the heel of the neck inside the guitar. There are a few different reasons for building a guitar neck like this. With the truss rod access inside the guitar, there is no need for a truss rod cover cluttering up the headstock. It is also easier to build a guitar with a truss rod with access inside the body.
I know what you are thinking. How am I supposed get inside the body to adjust that? It is pretty simple if you have the right tools. Most truss rods like this either have a nut or hex key slot in them. You will need either an allen wrench or a nut driver to adjust this truss rod. As you can imagine, getting leverage on your tool while your hand is in the sound hole can be difficult. That is why I suggest getting an extra long wrench or driver and bending it at a 45-degree angle about a third of the way down from the hand. This will allow you to turn the wrench without sticking your hand down in the sound hole.
Here are some steps to help adjust this type of truss rod.
- After you have checked your neck for relief or back bow, loosen the strings. You don’t have to loosen the strings to adjust the truss rod, but it can be difficult to get in the sound hole with the strings in place.
- Use your allen wrench or nut driver to adjust the truss rod. BE VERY CAREFULLY not to tighten the truss rod too much at once. Only turn the screw 1/8 of a turn at a time. Tightening the truss rod (turning it clockwise) will eliminate relief in the neck or add back-bow. Loosening the truss rod (turning it counter-clockwise) will add relief in the neck.
- After you have turned the screw 1/8 of a turn, retune the guitar. It is important to have tension on the neck. Without the string tension on the neck, you cannot see the extent to which you are moving the neck with each truss rod adjustment. Then you can measure the relief in the neck again.
- Repeat these steps as much as necessary until your neck is straightened.
It’s as simple as that. Remember to only adjust the truss rod about a 1/8 turn at a time.
How to adjust an Acoustic Guitar Truss Rod in the Headstock
Many acoustic guitars have truss rods that are accessible through the headstock/peghead. This truss rod is much easier to adjust than the truss rods with access in the body. It is very easy to tell if your acoustic has this style truss rod because it will have a decorative truss rod cover to hide the access point on the headstock. Most of these truss rods can be adjusted with an allen wrench or nut driver. Here are the steps to adjusting an acoustic guitar truss rod in the headstock.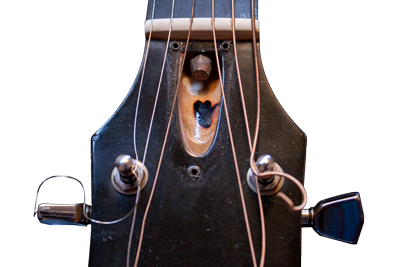
- Tune the guitar to pitch. It is important to have tension on the neck. Without the string tension on the neck, you cannot see the extent to which you are moving the neck with each truss rod adjustment.
- Remove the truss rod cover by unscrewing the screws with a micro-screwdriver.
- Lubricate the truss rod nut is possible/necessary.
- Only turn the screw 1/8 of a turn at a time. Tighten the truss rod screw to eliminate relief in the neck or add back-bow. Loosen the truss rod screw to add relief in the neck.
- After you have turned the screw 1/8 of a turn, retune the guitar. It is important to have tension on the neck. Without the string tension on the neck, you cannot see the extent to which you are moving the neck with each truss rod adjustment. Then you can measure the relief in the neck.
- Repeat these steps as much as necessary to straight the neck.
- Replace the truss rod cover after your acoustic neck is straight.
With all truss rod adjustments, do not drastically adjust the truss rod. Sometimes it takes time for the neck to settle into its new shape. If it feels like you have to keep tightening or loosening the truss rod for a single adjustment, retune the guitar to pitch and let it sit for a few minutes. This will give your guitar time to settle into its new shape.
Remember, the truss rod adjustment is only one step in lowering or adjusting the action on your guitar. Do not keep adjusting the truss rod if the action is not ideal. The truss rod is only mean to straighten the neck. The rest of the steps to completely setting the action on your acoustic guitar can be found on the adjusting your acoustic guitar action page. I cannot stress enough to be careful while adjusting the truss rod. There are many highly involved and expensive problems that you can be caused by over-tightening the truss rod.

THANKS>>>>>>>>>>>>>>>>>>>>>>>>>>B
The only measurement I find for the feeler gauge is .007 (string to fret with 1st and 13 fret held down). The feeler gauge you recommend goes from .017 to .040. What would I use this gauge set for? Thanks