
How to change the strings on your electric guitar with a Floyd Rose Bridge
Contents
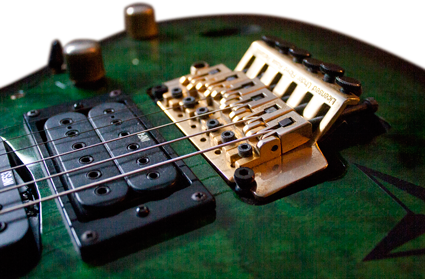
Guitars with Floyd rose bridges are fun to play. The huge dive bombs and crazy tremolo sounds that you can make with these bridges are the only reason a Floyd rose is worth having on a guitar. Floyd rose bridges can be a pain to tune and an even bigger pain to restring if they aren’t set up right. There are a ton of different ways to change the strings on a Floyd rose bridge, but these are just a couple of ways that have worked for me. I love my guitars with Floyd rose bridges. Once you know how to restring your Floyd rose, you’ll love yours too.
Removing the old strings from your Floyd Rose Bridge
First, we need to remove the old strings. Most Floyd rose bridges have locking nuts to keep the strings from sliding on the nut when you are doing a lot of tremolo action. Use an allen wrench to remove the locking nuts and set them aside for later. Now you can detune your guitar. Take a look at the bridge as you decrease the string tension. The bridge springs will pull to the bridge into body because the string tension isn’t counter balancing the bridge anymore. Sometimes I like to put a small wooden block under the Floyd rose to stop it from being pulled into the body, but that isn’t always necessary.
Now that the strings are detuned, you can pull them off the tuning posts. After the strings are removed from the tuners, you can take another allen wrench and loosen the Floyd rose bridge saddles to remove the strings from the body. If you didn’t block the Floyd rose bridge, the bridge is probably pulled down into the body. You may have to pop the trem arm in and tilt the bridge down, so you can get at the saddle bolts. I talk more about this in the next section. The strings on a traditional Floyd rose bridge will slide right out of the bridge saddles because the balls were cut off the ends of the strings. Newer bridges like the Ibanez Edge bridges don’t require you to cut the strings before putting them in the saddles. This is great for putting the strings in the bridge, but sometimes the strings get caught trying to take them out.
Clean the Fretboard
Whenever I change the strings on any of my guitars or my customers guitars, I always clean the fretboard. Most electric guitar fretboards are unfinished–meaning there is no lacquer sprayed on the fretboard itself. Among these unfinished fretboards, ebony and rosewood fretboards are the most common. You can use any number of special fretboard cleaning products to clean your fretboard, but I like to use Murphy’s Oil Soap. Oil soap not only helps clean your fretboard, it also helps condition and moisturize it. Since your fretboard is unfinished, there is no layer of lacquer to help protect it from the elements. The fretboard can dry out and even crack if it is severely dried out. Oil soap will prevent your fretboard from drying out. It will also give your fretboard a new clean shine.
To clean your fretboard, simply drip a small amount of oil soap on your fretboard. It doesn’t take much–a little goes a long way. Then take some #0000 steel wool and rub the oil soap into the fretboard and remove the dirt buildup. You may want to cover your pickups, so that pieces of the steel wool do not get magnetically stuck to the pole pieces. I like to polish the frets at the same time. While the steel wool is soaked in the oil soap, you can rub and polish the frets with the steel wool until the frets are shiny and clean. After the fretboard and frets are cleaned, you can wipe away the excess oil soap with a piece of paper towel. Now your fretboard is clean and conditioned and your frets are nice and shiny. Here’s some info about how to clean a finished fretboard.
Restringing your Floyd Rose
Most guitars go out of tune because the strings slip out of place. This is particularly true when it comes to Floyd Rose bridges. You will want to make that the strings are tightened both in the bridge and in the nut to prevent string slippage. That being said, let’s get started.
Use a pair of string cutters or fret nips to cut the balls off the ends of the strings. I usually only cut one string at a time. This just makes it easier to keep track of what string is next. Cut the ball and put the string all the way into the bridge saddle slot until it touches the bottom. Now take your allen wrench and tighten the string in place. I like to slightly flatten the string in the saddle, so I tighten the saddle until it touches and then tighten it a bit more. I like to call this finger tight. Be careful when you put the allen wrench in bridge. Most Floyd rose styled bridges are poorly designed for this purpose and have the saddle wrench access in the back of the bridge. Because there is no string tension, the back of the bridge is sunken way down into the body. Don’t worry. If I didn’t block the bridge, I usually just pop in the trem arm and tilt the bridge back down until I can use the wrench without scratching the body. It’s a little cumbersome, but it works.
After all the strings are tightly secured in the bridge saddles, I like to start stringing it up with the outside strings. First, I line up all of the tuning postholes, so the holes are open toward the nut. This way the string can go straight through the tuning post. Now you want enough slack in the string to wrap it around the post approximately three times. This keeps the string from slipping when the guitar is tuned. You don’t always have to have a full three wraps, but it is a good general rule of thumb. The string posts themselves can be used to measure the ideal amount of string slack. Pull the sixth string through the post until it’s tight. The sixth string is the ideal length at the fifth string’s tuning post. Grip the string at the fifth string’s post and slide the string back through the sixth string’s post until your fingers hit the sixth string tuning post. Now bend the string in a 90-degree angle. This bend will help keep the string from pulling out of the tuner while you are tightening the tension. Next, pull up on the string to maintain tension on it while you are turning the tuning button with your string winder. Make sure each new wrap of the string is below or underneath the previous wrap. Wrapping the strings like this prevents the strings from slipping when you bring it up to pitch. The tapered tuning post squeezes the string in the post’s hole by forcing the wrapped strings toward the center of the post. You can use this process for each string.
After the string is securely in the post with a few wraps around the post, you can bring it slightly up to tension. Don’t try to tune it right away. The bridge springs need to settle, so tuning it string by string is kind of pointless. Put all the strings in the posts and slightly tighten each one. Now I like to bring the Floyd rose closely up to tune using the outside strings and working my way to the middle. I don’t tune it all the way up in one shot. I just get it close the first run. Usually, I bring the sixth string up to tune, then the first, then fifth, then second, etc. This just kind of balances the bridge as it adjusts to the new tension. Once everything is close to being in tune, I will tune the guitar like normal from the sixth string to the first.
Stretching the strings
Whenever you change the strings on your guitar, it is important to stretch the new strings. Stretching your strings will help keep them in tune better later on. Once the guitar is in tune, I like to place my thumb flat on the top of the string and my fingers on the bottom of the string–kind of like playing fingerstyle. Then I just push down with my thumb and up with my fingers. I like to start at the bridge and bend the string a few times going down the neck. It’s important to do this to all the strings. Stretching the string will initially make your guitar go out of tune, so you’ll have to retune it one more time.
Lock the Floyd Rose nut
Now that the strings are stretched, you can do the last tuning before you lock the nut. Make sure the fine tuners on the bridge are set to the middle. It is nice to have room to flat or sharp the strings with the fine tuners after you have the nut locked in place. Now retune the guitar and screw the locking nuts back on. I like to make the locking nuts finger tight. You don’t want to crush the string in the nut, but you do want to flatten it out a bit. This tightness will keep the strings from slipping when you whammy.
Ready to play
Now you are all ready to play with a new set of strings on your Floyd rose guitar. Plug it into your amp and crank it up!
