
 Learning how to setup and repair your guitar bridge is one of the first steps to getting your guitar to play awesome.
There are many different styles of electric guitar bridges: stop tail, tune-o-matic, Floyd Rose, wrap around bridges, etc. Almost all of the different styles of bridges are made entirely out of metal. It is for this reason that most electric guitar bridges never need to be “repaired” unless something traumatic happens like you dropping your guitar.
If something traumatic does happen to your guitar bridge, you will most likely need to replace parts or the entire bridge itself. If your bridge has not been dropped or damaged, you probably need to set up your bridge. All electric guitar bridges need to be properly set up and maintained on a regular basis. I have listed below a few of the most common styles of electric guitar bridges as well as links to buy replacement bridges and parts.
Guitar Bridge Repair Tools You’ll Need
Contents
Here is a list of guitar setup tools that you’ll need in order to setup and repair almost all electric guitar bridges.
Electric Guitar Bridge Setup Kit
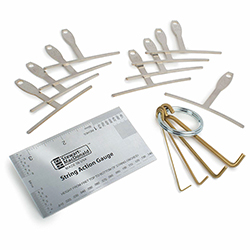 This basic guitar setup kit has a few different tools you will need to do most guitar bridge setups. It includes a string height ruler, a set of string radius gauges, and a small set of allen wrenches to adjust the truss rod. If you aren’t going to get any other tools, this is the set to get!
Guitar Radius Gauge
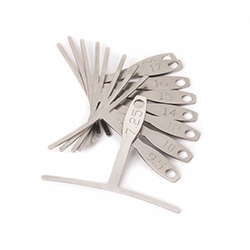 These guitar radius gauges help you measure the fretboard radius while the strings are still on the guitar, so you can accurately set the bridge to match the fretboard. This is a key step in the action adjustment process.
Guitar String Height Ruler
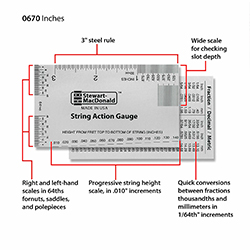 There is no better tool to measure your guitar string height. Each side of this rule has different measurements on it, so you can measure the action as well as different key setup measurement like string spacing.
Guitar Screw Driver Set
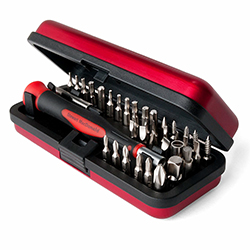 Every guitar company has a slightly different style guitar bridge. This makes it kind of annoying to set the action on all of them because you need a bunch of different screw drivers, allen wrenches, and star keys. This set solves that problem by giving you everything you need in one easy to carry case.
Guitar Saddle Files
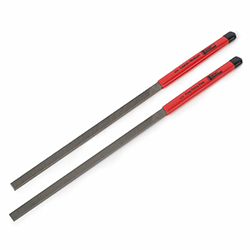 Some electric guitar saddles are either not shaped right or simply stick too far out of the bridge and need to be lowered. These files are super sharp and help you cut the notches in the saddle pieces and lower them without any problems.
Guitar Saddle Vise
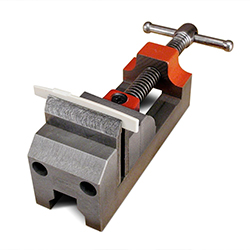 If you are doing any repairs or setups to your guitar nut or saddle, you have to get one of these. This is a specially designed vise with low profile jaws, so you can easily file down and shape your guitar nut or saddle without hitting the vise with your file.
How to Setup and Repair Different Electric Guitar Bridges
Fender Styled bridges
Fender has made many different styles of bridges throughout the years, although the basic design of the Fender bridges has stayed the same. Each string is strung through the body or bridge and mounted on top of a saddle piece. The saddle pieces can be adjusted toward or away from the top of the body as well as toward or away from the fretboard.
Most Fender bridges use a 1.5mm allen wrench to raise or lower the individual saddle pieces. A Philips screwdriver is required to move the individual saddle pieces closer or farther away from the pickups. Fender styled brides are easy to set up and easy to replace. Here are some articles on how to set up a Fender styled bridge:
- How to set the action on a Fender styled bridge.
- How to set the intonation on a Fender styled bridge.
- How to set the string radius on a Fender styled bridge.
- Replacement parts for a Fender styled bridge.
Gibson Styled or Tune-o-matic bridges
The Gibson or Tune-o-matic bridge is much different than the Fender style bridges. The Gibson or Tune-o-matic styled bridge consists of two separate pieces: a stop tail and a bridge piece. The stop tail is the piece of the bridge where the strings are strung through and anchored to the body. Usually, the stop tail consists of studs that are bolted into the top of the guitar and the stop tail piece that rests in the studs. The stop tail is held in the studs with string tension. Once the strings are loosened, the stop tail will fall out of the studs. The bridge, on the other hand, is bolted to the body and holds the saddles and intonation pieces.
The same principles about saddle movement that apply to the Fender style bridges also apply to the Gibson or Tune-o-matic style bridges. The only difference is how you adjust the saddle pieces toward or away from the fretboard. On the Gibson or Tune-o-matic style bridges, the saddle pieces are attached to screws that are threaded through the bridge piece.
When the screws are tightened or loosened, the saddle pieces move forward and backward in relationship with the pickups. The individual saddle pieces cannot be adjusted up or down like the Fender style bridges can. The only way to adjust the string height on a Gibson or Tune-o-matic bridge is to adjust the entire bridge piece up or down. Like all electric guitar bridges, the Gibson or Tune-o-matic bridge needs to be set up properly. Here are some articles on how to set up a Gibson or Tune-o-matic bridge:
- How to set the action on a Gibson or Tune-o-matic bridge.
- How to set the intonation on a Gibson or Tune-o-matic bridge.
- How to set the string radius on a Gibson or Tune-o-matic bridge.
- Replacement parts for a Gibson or Tune-o-matic bridges.
PRS or Tone Pros wrap-around bridge
The PRS or Tone Pros wrap-around bridge is elegant and fairly easy to set up. Unlike the Gibson or Tune-o-matic bridge, the PRS style bridge only has one bridge piece. The PRS wrap around bridge combines the bridge and stop tail pieces together. Eliminating one whole fixture on the top of the guitar frees up space and, in my opinion, is far less cluttered looking.
Rather than having the strings strung through the stop tail and the saddles anchored in the bridge, the PRS style bridges have the strings strung through the bridge away from the fretboard, wrapped around the backside of the bridge, and set on top of the saddles that are anchored in the bridge. Not all PRS style wrap-around bridges have adjustable intonation pieces.
The intonation can only be adjusted on bridges with movable saddle pieces. PRS guitars with wrap around bridges without adjustable saddle pieces need to be mounted precisely on the top of the guitar in order for the guitar to be properly intonated. Adjustments on an adjustable PRS wrap around bridge are fairly easy. Here are some articles on how to set up a PRS or Tone Pros wrap-around bridge:
- How to set the action on a PRS bridge.
- How to set the intonation on a PRS bridge.
- How to set the string radius on a PRS bridge.
- Replacement parts for a PRS bridge.
Floyd Rose Styled Bridges
The Floyd Rose bridge has been popular almost since its inception in the late 1970s. Floyd Rose engineered the design of the bridge because he was dissatisfied with the bridges available at the time. Soon after he built the first prototype, he installed it on his Les Paul. The Floyd Rose bridge did not attract a strong following until Eddie Van Halen popularized it with his dive bombs and pitch harmonics. Today, many metal bands and rock guitarists use the Floyd Rose bridge for its versatility and special characteristics.
At first glance, a Floyd Rose bridge might look complicated and difficult to work on. The truth is, the Floyd Rose bridge is more of a pain than it is difficult to work on. In order to get a better understanding of how to set up your Floyd Rose bridge you must understand how it works. I will walk you through the anatomy of a Floyd Rose bridge and explain how each piece functions.
On a traditional Floyd Rose bridge, the strings are placed inside of the saddles and secured with a setscrew that clamps the string in place. These setscrews nearly run the length of the bridge and are accessible from the back of the bridge. In order to insert the strings in the saddle pieces, you must loosen the setscrews. The setscrews will unscrew and pull the saddle block out of the saddle. The string will slide in the saddle and the setscrew can be tightened. Each individual saddle piece is anchored to the bridge with a screw that rides in a slot notched in the saddle.
Much like the Gibson style bridges, the Floyd Rose bridge saddle pieces cannot be raised and lowered individually. To adjust the action on a Floyd Rose Bridge, you will have to raise or lower the entire bridge via the two anchor posts that the bridge pivots on. For more explanation about how the Floyd Rose bridge pivot and functions, please see the Floyd Rose bridge set up page. Here are some articles on how to set up a Floyd Rose bridge:
- How to set the action on a Floyd Rose bridge.
- How to set the intonation on a Floyd Rose bridge.
- How to set the string radius on a Floyd Rose bridge.
- Replacement parts for a Floyd Rose bridge.
