
 Learning how to lower the action on your guitar nut can make your electric guitar play better and get rid of unwanted fret buzz. It can also help keep your guitar strings from going out of tune or breaking, so let’s look at the steps to adjust the action on your electric guitar nut.
Remember, many different problems can cause high action on your guitar. Neck relief and saddle height are only two contributors to high action. One of the main causes of high action is an improperly set up nut. This is probably the most overlooked cause of high action and rightfully so. It is usually pretty obvious to beginners that their neck has excessive relief and saddle pieces are too high. A raised nut might be a little less obvious to a beginner. They just know the guitar is uncomfortable to play. The action at the nut affects the guitar completely different than the action at bridge. High action at the nut is particularly bad because it will force the entire guitar to play uncomfortably.
Usually, the problem continues to worsen higher on the fretboard. Like any high action problems, intonation can be affected. High action at the nut can make the guitar untunable at the lower frets. Your open chords might not even sound right with an excessively high nut. Needless to say, the nut height plays an important roll in both the playability and functionality of your guitar. Lets talk a little about different styles of nuts before we get into how to lower them.
Guitar Repair Tools You’ll Need to Lower the Action on Your Guitar Nut
Contents
Before we talk about the steps to lowering the action at the nut of your electric guitar, we should talk about the tools you need. For most nut repairs and set ups, you will need some basic tools.
Guitar Nut Files
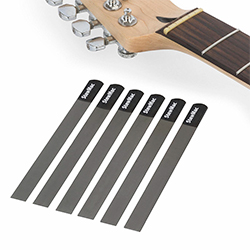 To lower the action at the nut you will need a series of nut notching files. These files are specially designed with the right measures to create the right size notches in the nut for the strings to sit in. Usually you will need 3-6 different file sizes for a standard nut. Here is a complete set.
Feeler Gauges
 You will also need a set of feeler gauges to measure the height of the string at the first fret. Since the string is so close to the first fret, you can’t really use a regular ruler. It’s much easier to just use feeler gauges.
Guitar String Height Ruler
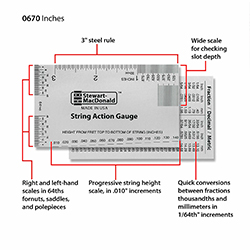 This is probably the coolest and most versatile guitar tool there is. It’s a rule with different key measurements on every side. You can use it to measure the action at the 12th fret, the string spacing on the nut, or just about anything else. You’ll need one of these.
Guitar Nut Seating File
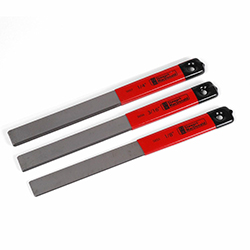 You may also need a small nut seating file that is used to file down and level out the nut slot. It’s not uncommon for the nut to come loose or just be seated in the slot wrong. If that’s the case, you will need this file to level out the slot to get the nut sitting in there snuggly.
As I discussed earlier, the steps to setting your nut action will depend on the style of nut on your electric guitar.
Now that we have all the basics covered, let’s get to work.
How to set the action on your Fender inlayed nut and Gibson style nuts
The Fender inlayed nut and the Gibson style nut are quite easy to set the action. Although these are different styles of nuts, they both get repaired the same for action adjustments. Here are the steps to setting the action on electric guitar at the nut.
Tune your guitar
First, bring your guitar up to pitch if it isn’t already.
Measure the action
Second, you will want to measure the action of the string above the fret, so you have an idea about how much of the nut needs to be filed down. Take your feeler gauges and check the height of the sixth string, lower E string, at the first fret. For beginners unfamiliar with feeler gauges, this is easy to do. Simply place the feeler gauges on top of the first fret.
Keep checking the distance between the string and the top of the fret with larger feeler gauges until you see the string move because the feeler gauge is too big to fit in the gap. Use the largest feeler gauge that does not move the string. That is the distance between your string and the fret.
Loosen the string
Third, loosen the tension on the sixth string until you can pull the string out of the nut notch. Be careful when you do this. It is easy to loosen the string just enough to pop it out of the notch and damage the nut. Since the first and sixth strings are on the edge of the nut, ripping them out of the notch can cause the outer edge of the nut to snap off.
My advice is to loosen the string enough so that is easily can be pulled out of its notch and placed on the side of the nut. Once you have done this a few times you can rest the slightly loosened string on the top of the nut, but I wouldn’t do that until you had a feel for it. You don–t want a simple nut repair to turn into a full nut replacement by breaking the edge of the nut off.
File the nut
Fourth, get the sixth string nut file out. Each string is a different diameter and needs a different size notch to sit in the nut. That is why I said earlier that you would need three different sized nut files. The special files that Steward MacDonald and Luthiers Mercantile Inc. sell are double sided. Each file has a large and small filing side. Here is a guide as to which size file you need to use with each sized string:
| String | Nut File Size |
|---|---|
| 6th string or Low E string | .060″ |
| 5th string or A string | .050″ |
| 4th string or D string | .042″ |
| 3rd string or G string | .036″ |
| 2nd string or B string | .032″ |
| 1st string or high e string | .026″ |
These are the right size nut files for traditional string gauges. If you use heavier gauge strings, you may need to use a .060″ file for both the sixth string and the fifth string. So after you loosen the string and pull it off to the side, you may want to find a thick piece of plastic or masonite to place on the headstock between the tuners to protect the headstock from being filed into. If you are careful, you will not file into the headstock, but there is no reason why you can’t take preventative measures.
Next, take the correct nut file and place it in the notch and file at the same angle as the headstock toward the headstock. This is very important. You want to make a point on the nut for the string to sit on. You do not want the notches to be filed flat. This will cause your guitar to sound like a sitar. File your notches at angle to make a single point where the string can rest. Only file the notches a small amount at a time. Be careful not to file too much at once. You can always take more material away from the nut. It is much more difficult to add material back on the nut.
Then, replace the string, tune it, measure it, and see if you need to file it down more. The “standard” measurement at the first fret is supposed to be .030 inches. Keep filing until you bring your string down to that height.
Move on to the next string.
After you have successful lowered one string to .030″ at the first fret, repeat these steps with the rest of the strings. Once you have lowered the action on all the strings, you can lower the action on the bridge. Please see the how to lower the action on my electric guitar bridge page for more information. Otherwise, it’s time to jam or practice with some online electric guitar lessons.
Different Styles of Electric Guitar Nuts
Electric Guitar Nut Materials
Electric guitars have many different styles of nuts made from many different types of materials. Nuts can be made out of bone, ivory, tusk, wood, metal, corian, Tusq, plastic and other synthetic materials. All of these materials will work for an electric guitar nut, some better than others. A “good” nut that produces “good” tone should be made of extremely dense material. Some of these materials are more dense and better suited for nuts than others.
It is important to know what kind of material your nut is made out of when you are planning to work on it. Each one of these materials is slightly different to work with. You will not need to add any material back on if all you are doing is lowering the action at the nut; however, in other repairs, it may be necessary to add material. You will want to match whatever material you are adding with the existing nut material. For more descriptions about the different nut materials, how to work with them, and how to choose what material to use, please see the electric guitar nut page.
Fender Styled Nuts
Fender makes guitars with every style of nut imaginable. The “classic” Fender nut on most Stratocasters and Telecasters will probably be a straight nut made out of bone, horn, or synthetic material glued in a slot on the fretboard.
These nuts are called inlayed nuts. A slot is routed a short distance from the edge of the fretboard and the nut is fitted and glued into the slot. The nut is then laid out for the string placement and notches are filed into it for the strings. For more information about how to make and/or replace a Fender styled nut, please see the electric guitar nut page.
Gibson Styled Nuts
Most Gibson electric guitars made today have synthetic nuts like corian, but older Gibsons could have nuts made out of bone or other materials. Unlike the Fender style inlayed nuts, Gibson traditionally made a nut similar to an acoustic guitar’s nut on their Les Pauls and SGs.
This style of nut is not inlayed in a slot in the fretboard. Rather, it is made thicker and taller than the inlayed nuts and butted up against the edge of the fretboard. The nut itself is glued to the neck–not the fretboard. These nuts are fitted to the neck and then glued in place. Once the nut is glued to the neck, it can be shaped and notched for strings. For more information about how to make and/or replace a Gibson styled nut, please see the electric guitar nut page.
Floyd Rose Locking Nuts
The Floyd Rose style of nut has become popular ever since Floyd Rose invented his revolutionary floating bridge in the late 1970s. The locking nut accompanied the Floyd Rose bridge to help keep a guitar in tune with a change of string tension from the Floyd Rose bridge.
Locking nuts are made of metal and have places for a lock to be bolted into the nut. The lock bolts into the nut and sandwiches the strings between the lock and the nut. This keeps the strings from shifting in the nut during huge dive bombs with the wammy bar. The strings generally stay in tune with the locking nut during wammy usage if the bridge is set up properly.
The major drawback to the locking nut is that once the locks are tightened, you can no long change the tuning with the tuners. You must use the fine tuners on Floyd Rose bridge. Nonetheless, the locking nut does its job. For more information about replacing or installing a locking nut, please see the electric guitar nut page.
Fender Roller Nuts
The Fender Roller nut is a unique innovation. The nut has balls on the inside of each string notch. The balls guide the strings through the notch and allow the strings to roll on the balls freely. This design helps prevent the string from getting stuck in the string notch when you are tuning the guitar.
On a traditional Fender nut, if the string notches in the nut are too narrow, the string can get wedged in place. When the string is brought up to pitch, the string will get stuck until the tension is great enough to force the string through the narrow notch. The string then skips and will probably have to be retuned again.
The Fender Roller nut is aimed at fixing this problem by eliminating tension between the string and the nut. The string can easily slide through the string notches on top of the ball bearings. For more information about replacing or installing a Fender roller nut, please see the electric guitar nut page.

Question: Can a Floyd Rose locking nut be filed down in the same way, or will that interfere with the locking mechanism?
Conor, you can’t file a Floyd Rose locking nut. For locking nuts, to adjust the height you have to add or remove shims. If the nut is too high, take it off, and there’s probably a shim underneath that you could remove.
Wow. I currently have .008″ at the first fret on low & high E.
Time for a new nut. My Strat clone has the Gibson-style nut, at the front of the fretboard. Time to measure this one the best I can and see if they have any pre-made nuts that are close enough to make work.
Weirdly enough, I really don’t get any fret buzz unless I strum/play a note extremely hard and usually only on low E. Still need to raise it up at least another .010″ to .015″