

What is Guitar Action?
Contents
Action – The action on a guitar refers to the height of the strings above the fretboard. Action is usually measured at the 12th fret, but it can also be measured at the 1st fret. “High action” refers to guitar strings that are positioned far above or away from the fretboard. The opposite is true about guitars with strings positioned closer to the fretboard.
Action or string height plays an important role in the playability and comfort of the guitar. Improper action cannot only cause a guitar to be uncomfortable, it can also cause problems with tuning and intonation. Generally, the higher the action on a guitar, the more difficult and uncomfortable the guitar is to play and the lower the action, the easier and more comfortable the guitar is to play. Usually an action setup is a compromise between having the strings high enough not to buzz on the frets and low enough for comfortable playability. If you picked up an expensive guitar in a music store and found that it was uncomfortable to play, it could be that the action is not properly set. This discomfort has nothing to do with the price on the guitar; it is probably just not setup correctly.
You might ask how high should I adjust my action. The truth is that different styles of players tend to gravitate toward different action settings for different reasons. String action and volume are directly related. That is why classical guitar players have higher action than steel string guitar players. Lower action allows guitarists to play faster. That is why metal guitarists will usually have lower action than country guitarists. Essentially, the action on your or anyone else’s guitar is pure preference. There is no right or wrong string height, to an extent. Guitars come out of the factory with standard action settings that the manufacturer deems appropriate. Some of these setting are not always the most comfortable for individual players’ styles. I will show you how to set your action to an industry standard action setting. Beyond that, it is up to you to fine-tune the action on your guitar to fit your personal style.
Tools You’ll Need to Lower Your Guitar Action
Here’s a list of guitar repair tools that you will need to lower the action on your electric guitar the right way.
StewMac Basic Guitar Setup Kit
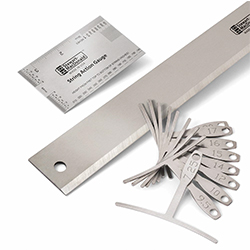 The StewMac guitar setup kit comes with a straight edge to check how straight the neck is when you are straightening the trussrod. It also comes with a set of gauges to measure both the string action height as well as the string and fretboard radius. If you want to do a complete setup on your guitar, this is the set to get.
String Action Gauge Height Ruler
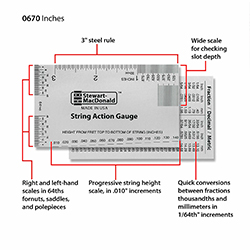 If you want to get an accurate setup with low, smooth action without any string buzzing, you have to get a string height ruler. This is the same rule that comes with the full set. It helps you measure your action, nut slot, and a bunch of other key measurements.
String and Fretboard Radius Gauge
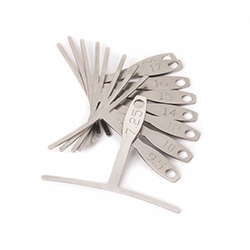 There is no way to get your strings lowered evenly without measuring the fretboard radius. You have to match your string radius with the fretboard to keep them all evenly above the frets. Here is another set the gauges that I use.
Action Adjustment Kit
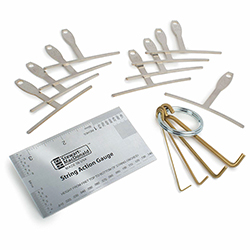 Here is another action adjustment kit that doesn’t include the straightedge, so it’s a little bit more affordable. It also comes with a set of allen wrenches that fit the most common truss rod sizes.
What causes high action on a guitar?
Before we start adjusting the action, it is important to know what causes the action to change and why it needs to be reset. Understanding how the action changed will help us diagnose the problems and properly set the action. Here are several changes to your guitar that can cause high action.
Temperature and Humidity.
As with all wood, guitars are affected by temperature and humidity. Drastic and rapid changes in either of these elements will change the shape of the wood. Excess humidity will cause your guitar to soak up water in the air and the wood will expand or swell. The opposite is true about a lack of humidity. Temperature works much the same way. Both of these elements can cause your neck to bow. In other words, your neck and fretboard are no longer flat. For an explanation of neck back-bow and relief, please visit the neck back-bow and relief page. For information about adjusting neck back-bow and relief, please visit the truss rod adjustment page.
String tension changes.
Strings put a considerable amount of tension on the neck of the guitar. Changing from a high to low or a low to high-tension string can cause back bow or relief in the neck. For an explanation of string tension, please visit the guitar string page.
Use and abuse.
Obviously, guitars are meant to be played and they can take a certain amount of abuse playing three or four nights a week at the local bars. Eventually, heavy playing can wear down the nut and/or saddle pieces causing the problems with the action. For more information about nut and saddle adjustments, please visit the nut adjustment page or the saddle adjustment page.
How do I lower the action on my guitar?
Depending on what is wrong with your guitar there are different ways to adjust the action. More likely than not, the cause or your high or low action can be fixed with a simple truss rod adjustment. If nothing traumatic happened to the nut or neck, i.e. the nut is broken or the neck is twisted, the action adjustment will be fairly simple. Your action adjustment also depends on what type of guitar you have and the hardware on the guitar. Generally, there are three steps the completely setting the action on your electric guitar. Don’t be fooled by some salesman at Guitar Center; in order to completely adjust the action on your electric guitar, you need to check and possibly adjust three different areas: truss rod, nut, and bridge. These adjustments must be done in this order because one adjust will affect adjustments done after it.
Adjust the truss rod
![]() The truss rod is a piece of metal that is inlayed inside of your neck. It provides support and flexibility to the neck. The truss rod can be tightened or loosened to straighten or flatten your neck. Most likely neck straightness is the cause of your high or low action problems. If you adjust the truss rod and your action is set where you want it to be, there is no need to move on to the following two steps. For step-by-step instruction on adjusting your truss rod, please visit the truss rod adjustment page.
The truss rod is a piece of metal that is inlayed inside of your neck. It provides support and flexibility to the neck. The truss rod can be tightened or loosened to straighten or flatten your neck. Most likely neck straightness is the cause of your high or low action problems. If you adjust the truss rod and your action is set where you want it to be, there is no need to move on to the following two steps. For step-by-step instruction on adjusting your truss rod, please visit the truss rod adjustment page.
Adjust the action at the nut
![]() Once the truss rod is adjusted and the neck is as flat as you want it, you can check the action at the nut. In order to measure the action at the nut, you will need a set of feeler gauges. The action at the nut is measured at the first fret. A “standard” measurement of the distance between the bottom of the string and the top of the first fret is .030 inches. If the string is higher than .060 inches, you will need to file down the nut. For step-by-step instructions on filing down the nut, please see the how to the action at the nut on my electric guitar page.
Once the truss rod is adjusted and the neck is as flat as you want it, you can check the action at the nut. In order to measure the action at the nut, you will need a set of feeler gauges. The action at the nut is measured at the first fret. A “standard” measurement of the distance between the bottom of the string and the top of the first fret is .030 inches. If the string is higher than .060 inches, you will need to file down the nut. For step-by-step instructions on filing down the nut, please see the how to the action at the nut on my electric guitar page.
Adjust the action at the bridge
![]() The last step to a complete action adjustment is to check and adjust the action at the bridge. Depending on what style of bridge your guitar has, it may be relatively easy or relatively complicated to set the action on your bridge. For detailed instruction on setting the action on all bridge types, please see the adjust the action at the bridge page.
The last step to a complete action adjustment is to check and adjust the action at the bridge. Depending on what style of bridge your guitar has, it may be relatively easy or relatively complicated to set the action on your bridge. For detailed instruction on setting the action on all bridge types, please see the adjust the action at the bridge page.
