
 Have you ever had your guitar cut out when you bumped your input jack on stage? How about your guitar crackle and cut out while you plug in your guitar and adjust the tone knobs? Or have you ever wanted to swap out your pickups for a set of new pickups? All of these problems can be fixed with some simple soldering. Soldering electronics is really easy. I think every guitarist should learn how to solder his own electronics. You never know when your solder will break and leave you without power on stage. In this article, I will show you the basics of soldering guitar electronics, what to watch out for, and how to make a lasting solder connection.
What is Soldering?
Contents
Soldering is connecting two different metals using a third metal. In other words, connecting the wiring to the lug with solder. Solder, itself is a metal alloy that has a very low melting point. To connect the two pieces of metal, you melt solder on two pieces of metal. When the solder solidifies, the wiring and the lug are fused together.
What You Need to Solder Your Guitar Electronics.
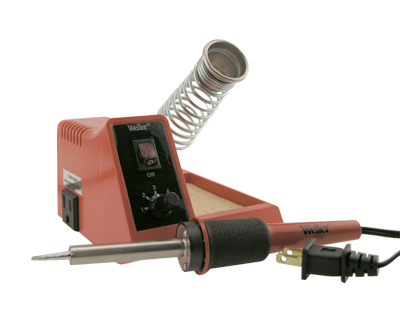
Soldering Iron.
Soldering irons are relatively inexpensive and simple devices. Basically, a soldering iron is just a device that uses electric current to heat up a metal tip. They come in a range of heating wattages. I would recommend getting a soldering iron between 15 and 45 watts. You don’t want anything higher than that because you run the risk of creating too much heat. This is a problem that we will address later, but too much heat will burn up your electronic components. The nicer irons have removable/interchangeable tips made out of iron-plated copper. I would suggest getting either one of the two below. The Weller WLC100 Soldering Station comes with everything that you need. It has the soldering iron, stand, extra tips, sponges, and solder. If you are just looking for an inexpensive soldering iron, you could also get the Weller SP23LK Marksman kit. Both of these are great soldering irons that will get the job done.
Solder.
The kind of solder you use is obviously important since it is the material holding your wiring together. You will want to get this 60-40 tin-lead, rosin core solder. This solder is the industry standard for electronic soldering. This solder melts easily and holds your joint solidly. It does however give off toxic lead fumes while you are soldering, so many companies are starting to produce rosin core solder without lead in it. I would recommend getting either of these two solders.
Wire Strippers.
Wire strippers are used to remove the insulation or external, protective coating around the wiring. Because we are dealing with pretty small wires, i.e. pickup wires, you will want to get a small gauge wire stripper. I recommend the wire strippers below because they have multiple size gauged holes from 10 to 22 as well as a wire cutter. Fo extra small wires you may even need a smaller wire stripper than 22 gauge, but this one will work for most jobs.
Damp Cleaning Material.
You will need some type of damp material to clean the end of the soldering iron. You can use a damp sponge, but I like to fold a paper towel over a couple of times and wet it down. This works well for me. The damp cloth also keeps the soldering iron from overheating and burning up your electronics like your guitar pots and switches.
How to Solder your Guitar Electronics.
Soldering can be quite tricky at first. You will realize once we started that you could use about four or five different hands in the process. Soldering is very easy with a little practice. It just takes a few tries while you are learning. After you get the hang of it, you will be soldering in your sleep. I would suggest that you practice on something other than your original Black Beauty Les Paul at least until you are ready to take on your prized axe. Relax soldering is easy. Let’s walk step-by-step through the process of soldering your electronics.
Step 1: Strip the Wiring.
Some pickups will have wiring with exposed wire ends, but most wires will need to be stripped. As I stated earlier, stripping the wire refers to removing the insulation or rubber coating around the wires. This is easy to do with a pair of wire strippers. Simply, place the wiring in the correct hole of the wire stripper and clamp down on the wire. The sharp edges around hole of the wire strippers will cut through the insulation. Now while the wire strippers are still clamped on the wire, pull the insulation off exposing the wire. You do need to be careful while you are stripping the wire, however. If you use too small of a hole on the wire stripper, you will cut the internal wire and you will need to start over. If you didn’t cut all the way through the insulation and you pull the wire too hard, you can break the wire inside the insulation and you will need to start over. It might take a couple times before you remove the insulation nice and clean. You will want to expose about a quarter inch of wire for soldering. You don’t want too much wire exposed, but you need enough to solder onto the lug.
Step 2: Tinning the Solder Tip.
Tinning the tip of your soldering iron refers to coating the tip with a thin coat of solder. It is a good idea to tin your solder tip regardless whether it is new or used. New tips need some solder on them and used tips usually need to be cleaned, so plug your soldering iron in and let it heat up for a minute or two. Once it is up to temperature, you can wipe your tip off on the wet sponge or paper towel to clean the old oxidized solder off the tip. Next, take your spool of solder and melt a thin coat on the tip of the iron. You don’t need a ton of solder on the tip, but you do want to cover the entire tip. Once the tip is covered in melted solder, you need to wipe it off on the damp sponge immediately. This ensures that the solder and flux does not solidify. If you miss a spot or allow the flux to harden, your iron will not transfer heat as efficiently. Tinning the soldering iron will help transfer heat and allow the solder flow onto the wiring easier.
Step 3: Tin the Exposed Wire.
As I’m sure you have noticed, the exposed wire can be extremely small and delicate. Sometimes I like to twist the wire together and tin it as well. This helps keep the wire from breaking and keeps it bundled together. To tin the wire, simply heat up the exposed wire with the soldering iron and melt some solder on it. Once there is a thin coating of solder on the wire, immediately wipe it off on the sponge. You do not want a glob of solder on wire.
Step 4: Heat up and Soldering the Joint.
It is important to heat the joint before you try to apply the solder. Depending on what and where you are soldering, there are different steps to follow.
Soldering Electric Guitar Pots.
Soldering electric guitar potentiometers is a little different than soldering guitar switches and jacks. Electric guitar pots, a.k.a. the tone and volume knobs, not only have wires soldered to the three lugs of the pots, but they also have wires soldered directly to the pots themselves. As you will notice, there aren’t any hooks or lugs to solder onto on the back of the pot. It is just a smooth surface. To make a strong solder joint on the back of a guitar pot, you will need to heat up the pot with the soldering iron.
Take the warm soldering iron and slowly move it around the area where you are going to solder the wires to. You MUST be very careful when you are doing this. Don’t leave the iron in the same place too long and don’t heat up the pot too much. If the guitar pot gets too hot, you can burn up the electronics inside the pot enclosure.
Obviously, you will not find this out until you are all finished wiring your guitar, plug it in, and realize it doesn’t work. So just be cautious that you are not heating it too much. You just need the pot to be warm enough to melt the solder. Once the pot is warm, you can place your tinned wire on the pot. This is where it would be handy to have about four hands.
Now hold the wire against the back of the pot. Make sure the wire is held tightly against the pot. You don’t want a loose solder joint. With the same hand, hold the solder stick. With your other hand, hold the soldering iron on the pot. Now press the solder against the warm pot. It will liquefy and cover the wire. Remove the solder then remove the soldering iron. It is important that you don’t apply the solder directly to the soldering iron itself. You want to warm the pot and allow the solder to flow on the pot and around the wire–not on the soldering iron. When you remove the solder and the iron, make sure to hold the wire in place for a few seconds to let the solder harden and dry. You want the joint to set before moving the wire.
Once the solder is dry, check your connection or joint by wiggling the wire slightly. It should be stuck on there pretty good. If your connection is loose, heat up the pot until the solder is loose and try again.
Soldering Electric Guitar Input Jacks and Switches.
Electric guitar jacks and switches have small prongs that stick out from the side. These are called lugs. Lugs are external connectors for the electronics inside the switches and jacks. In other words, this is where the internal parts meet the external wiring. I know what you are thinking. Electric guitar pots have lugs too. I know they do. Pots also fall in this category. I just wanted to explain how to solder wire to the outside of a pot in the previous section. Now if you notice, each lug has a hole in the center of it. These holes are used for soldering and wiring. I like to slightly crimp the end of a tinned wire to form a hook that can easily grab the lug. Many people just try to solder the wire directly on top of the lug. This is ok, but there is a great possibility that the solder will break because the wire is not grabbing the lug itself. I like to make a hook with the wire to grab the lug. Before I insert the wire in the hole, I like to heat up the lug with the soldering iron. The same cautions apply that I mentioned in the previous section.
Once the lug is warmed up you can insert the crimped wire in the lughole. After the wire is in the hole of the lug, hold the wire so it is hooked around the lughole. With the same hand hold the solder. Now, grab the soldering iron and place it on the lug itself. Press the solder on the warm lug. It will instantly melt. You don’t need a ton of solder–just enough to cover the wire. Sometimes I like to fill the hole with solder. Keep holding the wire in place why the solder dries and hardens for a few seconds. Once the solder is dry, you can test your joint. If it is messy or loose, you may want to start over. You can heat up the lug and the wire will come straight out.
Obviously, this article just discusses the basics of how to solder joints. We haven’t talked about how to wire a guitar. For more information about how to wire electric guitar pickups and electronics, please see the electric guitar wiring page. After you are finished with your soldering, you can check out some guitar lessons online for beginners
