
 Learning how to level guitar frets and do a proper fret dress is one of the most important guitar repairs you will need to know in order to set up your guitar the right way.
The term “fret dress” refers to leveling and reshaping the frets. As you play your guitar, the strings wear down the frets because the strings are made out a harder metal than the frets. It is basically like taking a file to a chunk of steel. The steel will get worn down over time from the file. The strings leave little divots in the frets where they come into contact.
Dressing the frets levels out these divots and makes the fret perfectly flat again. Then the fret just needs to be re-rounded or crowned. This is a very common repair, as guitar frets will wear down as they are played.
Fret Dress and Fret Leveling Tools You Will Need
Contents
Leveling your guitar frets isn’t that difficult, but you will need some specialized tools in order to fret dress your guitar properly and make sure it plays better than ever. Here’s a list of tools that you will need in order to do this repair.
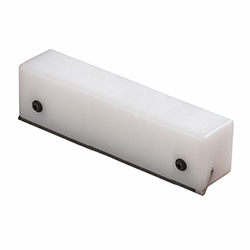
Leveling Beam
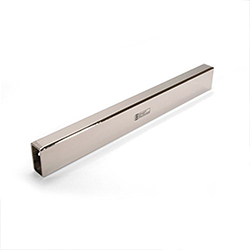 A fret leveling beam is a tool used to evenly sand all or most of the frets at the same time. It’s tubular bar with sandpaper attached to a machined edge to give you an accurate leveling. There is no easy way to do this repair without one of these.
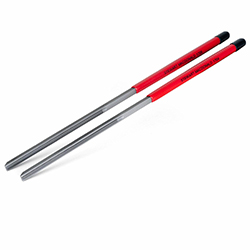
Straight Edge
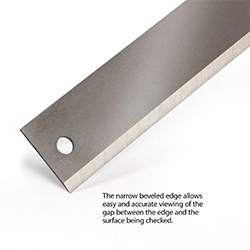 A straight edge is really important because it helps you identify what frets aren’t level. It also helps you check if you need to use the leveling beam more to completely level the frets.
Fret Rocker Tool
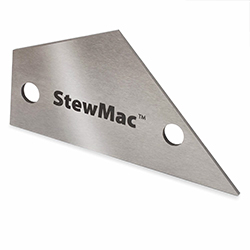 This awesome little tool helps you check single frets to see if they are uneven. This is a great tool to use after you have identified a problem with the straight edge. You can focus on a 3-5 fret area that is creating the unlevel problem.
Fret Crowing File
 After you level all of the frets flat, you will need to crown them to make them round again. You could do this with a standard file, but it takes a REALLY long time to do it that way. The best way to get uniform, perfected rounded frets is to use a fret crown file.
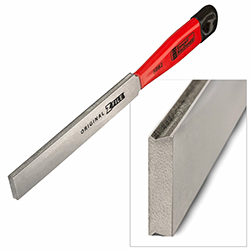
Fret Bevel File
 After you crown the frets and they are nice and rounded, you are going to need to use a file to re-establish the 45 degree angle on the ends of each fret. This angle prevents the fret from sticking in your fingers when you play. 🙂
Fret Files
 After you have beveled the fret edges, you will need to file any burrs on the fret ends, so you don’t have sharp edges poking your fingers and making you bleed. These files are specifically designed with sharp cutting edges and a thin profile to easily de-burr the frets.
Guitar Neck Rest
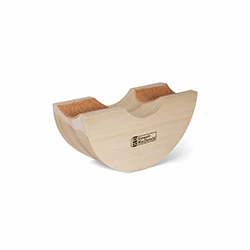 This tool is useful for any type of guitar repair. It works great for something as simple as changing your strings. Just put your neck in the pocket and it holds your guitar off the table securely, so you can finish the job.
Complete Fret Tool Kit
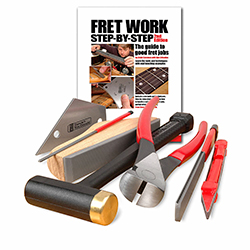 Another great option is to simply get a complete tool kit. Here’s a tool kit that comes with many of fretting tools listed above along with a few common fretting tools you will need for other fret repair work.
Fret and Fretboard Cleaning Supplies
The three cleaning products that I use the most when doing fret work are:
There you go, that’s a complete list of everything you need to get the job done. Now let’s start working, so you can get back to playing guitar!
6 Steps to Fret Dress an Electric Guitar with a Rosewood or Ebony Fretboard
 Prep the Frets and Fretboard
- Fret Leveling
- Recrown the Frets
- Dress the Fret Ends
- Polish the Frets
- Clean the Fretboard
Cover Magnetic Pickups
Before we start this repair, you should place some kind of covering over your magnetic pickups, so the filings and metal dusk from the frets will not stick to the pickups. The metal dust can be attracted to the pickups and collect on the pole pieces. Built up dust will cause poor pickup performance and can ruin your pickups eventually.
Check for Loose Fret Ends
A loose fret ends occurs when either of the ends of a fret are not fully attached to the fretboard. Fret ends can be slightly or extremely loose. Usually, fret ends become loose because the guitar has been dropped or banged up against something dislodging the fret. Fret ends can also come loose because they were never installed correctly in the first place.
Regardless of the origin, check to make sure that all of your frets are securely attached to the fretboard. If any of the frets are loose, you will need to fix the fret ends before you dress the frets. For instructions on how to fix loose fret ends, see the fix loose fret ends page.
Adjust the Truss to Straighten the Neck
It is very important that your neck is straight before you level your frets. If you level your frets while the neck is not straight, too much relief or back-bow, your frets will not be level after the neck is straightened. You will have taken a large amount of material off of the frets without actually fixing the problem. For instructions on how to adjust the truss rod, see the how to adjust the truss rod an electric guitar page.
Clamp the Body and Neck Down
Next, you will want to clamp your guitar down, so it won’t move around on you when you are trying to level and recrown the frets. There are several ways to clamp your guitar down. Probably the easiest way to clamp it down is to place your guitar on a table and run ratchet straps over the body and hook them to the edges of the table. You don’t want to ratchet them so tightly that you break something on the body, but you want them tight enough to keep your guitar stationary.
After you have your guitar snugged down to the table, you will need to make a support for the neck. You can make one out of a 2×4, or you can buy one. The support should not hold the neck higher than it naturally lies when the guitar is strapped to the table. The neck should not be propped up by the support. It should be resting on it.
It is EXTREMELY important not to put the neck on the support before you strap your guitar to the table. If the support is too high and you tighten the pressure on the straps around the body, the neck can break off or crack. The importance of the neck support is to secure and stabilize the neck from the pressure exerted by leveling the frets. The supports are there to absorb and redirect the pressure from the neck joint–not lift the neck up in the air.
Mask/tape off the Fretboard
Once the guitar is securely fastened to the table, you will need to tape off the fretboard leaving the frets exposed. You can use 1/2″ scotch tape for the lower frets and 1/4″ tape for the higher frets. Leave one end of the tape hang off the edge of the fretboard, so you can easily remove the tape after the fretwork is complete. Do not wrap the tape around the neck or down the side of the neck. Removing tape like this can remove finish as well. Keep the tape on the fretboard.
Mark the tops of the Frets
Take a sharpie marker and mark the tops of the frets. The marker will be a guide as to what parts of the fret have been leveled and which need to be leveled.
Level the Frets with a Leveling Bar
Next, you will need a fret leveling bar. A fret leveling bar is a rectangular piece of steel tubing that has two sides machined down to a precision flat finish. Take a piece of 320-grit adhesive sandpaper and attach it to the precision flat sides of the leveling bar. You can purchase one of these leveling bars directly from me. I manufacture several different sizes of fret leveling bars and offer them at a fraction of the price of the “brand name” ones.
Go to the leveling bar page to learn more about my fret leveling bars or contact me about fret leveling bar purchases. Once you have the sandpaper on the fret leveling bar, run the sandpaper side of the leveling bar back and forth against the frets . Also, run the bar side to side. When you are running the leveling bar back and forth make sure to watch the nut of the guitar.
One whack of the leveling bar and the nut can come clean off. Do not hit the nut with the leveling bar. Level the frets until all of the sharpie has been sanded off the tops of the frets. Pay attention to how much material you are sanding off the frets. If some frets are extremely low, you will have to sand a lot of material off the rest of the frets to bring them down to size.
Re-mark the tops of the Frets
After all or most of the sharpie is off the tops of the frets, re-mark the frets the same way you did it the first time. Lightly sand the frets again with the leveling bar just to make sure all the frets are being hit equally. Then re-mark the frets again.
Crown the Frets with a Crowning File
A crowning file is a special rounding file with concave edges that are made for frets. The nicer crowning files are encrusted with diamonds and come in different grits. I suggest getting a 300-grit file. Place a protective metal plate around the fret wire, so you don’t mark up the fretboard. Take the file and round the edges of the fret until it is perfectly rounds–no flat top.
A word of caution, you don’t want to have pointed or pyramid shaped fret wire. It should be nice and rounded. This might take some time. File both sides of the fret wire until you get a nice crowned top. There should be a thin line of marker left on the top of the fret when you are done crowning it. Hence, you do not file any material off of the top of the fret after you level it.
Sand the Frets with Sandpaper
Now that the frets are crowned, we can start the polishing process. You crowned them with a 300-grit file, so gently sand the fret with 320-grit sandpaper just enough to remove the lines from the file. Repeat this process with 600-grit and 800-grit sandpaper.
Polish the Frets
Take either #0000 steel wool or a buffer and polish the frets to a high shine.
Remove the Tape
To remove the tape, simple grab the end of the tape hanging off the fretboard and pull the rest of the tape off the fretboard. Do not just rip the tape off. Be careful because you do not want to take finish off the side of the neck or fretboard.
Clean Fretboard and Frets
After the tape is removed, drip some oil soap on the fretboard. Use a piece of #0000 steel wool to rub the oil soap into the wood and clean the frets and fretboard. Then wipe the excess oil soap off the fretboard with a rag.
How to Fret Dress a Guitar with a Maple Fretboard
Follow the same exact steps discussed above to dress the frets on a guitar with a maple fretboard except the follow:
Do not mark the tops of the frets on a maple fretboard
Sharpie marker will bleed into and stain the light maple fretboard. You should not use a marker to mark the tops of the frets of a guitar with a maple fretboard.
Do not apply oil soap to a maple fretboard
Do not clean a maple fretboard with oil soap.
Now your guitar frets are completely leveled and crowned. Your guitar should play better than when you brought it home from the store.
Related articles:
- How to do common Fret Repairs on Electric Guitars
- How to Dress Electric Guitar Frets
- How to Remove Electric Guitar Frets
- How to Bend Electric Guitar Frets
- How to Fret and Electric Guitar
- How to Fret an Electric Guitar with a Bound Fretboard
- How to Fret an Electric Guitar with an Unbound Fretboard
- How to Fret a Maple Neck Guitar
- How to Repair Loose Fret Ends
- How to Choose Fret Wire
- How to Polish Guitar Frets
- Learn Guitar Online

Great article but what about applying lacquer to the fretboard after dressing the frets, especially the maple necks?