
 First, before I show you how to set the intonation of your electric guitars, let’s talk a little about what intonation is. You may have noticed as you play your guitar higher on the fretboard or scale the guitar starts to sound out of tune. You may be able tune your guitar to make an open G chord sound in tune, but the G chord at the 10th fret sounds out of tune. You may have also noticed that the higher you play on the fretboard the more sharp or flat the notes become.
Another symptom of a poorly intonated guitar is that the individual strings may be tuned independently with a tuner so all the strings are in tune. Once the strings are strummed together in a chord, they no longer sound in tune with each other. If these symptoms describe your electric guitar, your intonation is out or not set up properly. I have explained some common causes of poor intonation later in this article.
Let’s take a look at a few tools you’ll need to fix your guitar intonation problem.
Guitar Intonation Repair Tools You’ll Need
Contents
Here’s a list of guitar repair tools that you’ll need to set the intonation on your guitar accurately and make your guitar finally play in tune.
Guitar Stobe Tuner
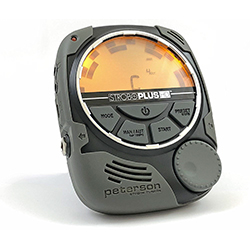 Probably the most important tool you can have in setting your intonation is a real tuner. Obviously, you can use a cheap one, but it’s not going to be that accurate. I recommend getting a strobe tuner to really dial in your guitar.
Guitar Tuner
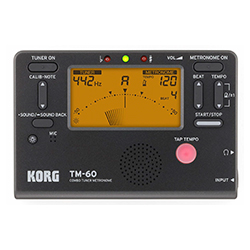 If you can’t afford a nice strobe tuner, this is a decent alternative. It’s not nearly as accurate, but it will help you do a fairly decent job dialing in your guitar tune.
Truss Rod Wrenches
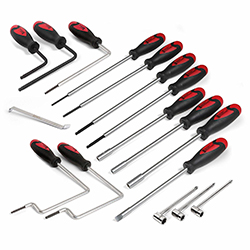 One contributing factor to poor intonation is having too much relief in your guitar neck. Here is the ultimate set of truss rod wrenches that you can use to straighten any guitar neck.
Guitar Screw Driver Set
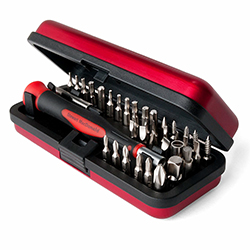 There are a ton of different types of guitar bridges. Each has a slightly different setup and requires a slightly different set of allen wrenches, screw drivers, and star key bits. This set has everything you will need to adjust most guitar bridge saddles.
Before You Set Your Guitar Intonation
For simplicity’s sake, intonation is the tune or pitch of your collective, guitar strings as you move up the fretboard or scale length. Although it is impossible to perfectly intonate your guitar because of its equal temperament tuning, it is possible to come to a compromise with a proper set up. The intonation can be set on your electric guitar to make the second octave, the 12th fret and above, stay closely in tune with the first octave.
The way to adjust guitar intonation is to shorten or lengthen the scale length of each individual string. Here is a list of guitar intonation topics most people have questions about. After you take a look, let’s start adjusting your guitar intonation!
- How to Adjust Your Guitar Intonation at the Nut
- How to Adjust Your Guitar Intonation at the Bridge
- What is Guitar Scale Length?
- How to Check Your Guitar’s Intonation
- What Causes Poor Intonation?
- Change Your Strings!
Guitar Scale Length
The scale length on a guitar is the distance between the edge of the nut, where the strings touch the nut, and the top of the saddle pieces, where the strings meet the saddles. To measure the scale length on your guitar, you can measure from the inner edge of the nut to the center of the 12th fret. Multiple that distance by two. This simple measurement and calculation is your guitar scale length.
If you notice, this distance will be the same for all the strings; however, the distance between the center of the 12th fret and the tops of the saddles pieces will most likely be different for each string. These distances are not equal because the scale length has been adjusted to compensate for the intonation.
Checking Your Guitar Intonation
Checking the intonation on your electric guitar is easy. Simply grab a tuner and tune all of your strings at the harmonic on the 12th fret: E A D G B e. It is very important that you use a high quality tuner. You will be adjusting the intonation in very slight increments and you want to be as accurate as possible. The nicer and more accurate your tuner is the more accurate job you can do adjusting the intonation. Strobe tuners are expensive, but they are the most accurate. Here is a link to the Peterson 590 AutoStrobe Tuner. This tuner is extremely accurate and relatively affordable as strobe tuner go.
I would suggest buying/using a tuner with an accuracy of 1/10th of a cent. For my suggestion of tuners, please visit the tuner page. Once the strings are in tune, you can place your finger on the 12th fret and pluck the string. Your harmonic on the 12th fret and the fretted note on the 12th fret should both play a the same note–neither sharp nor flat. Most likely the fretted 12th fret note will be a little sharp or flat. You can adjust the intonation of the 12th fret by compensating the scale length. Keep reading for instructions on compensating the scale length.
Change Your Strings!
If you check your intonation and it is off, the first thing you should do is replace your strings and check it again. It is not common to open a new set of strings from a manufacturer and find out they are bad, but it happens. Strings that are not made properly will not stay in tune and will sound “dead.” These strings may also not allow proper intonation. Old, worn strings may also have intonation issues. That is why before you go any further in the article you need to replace your strings with new ones.
Replacing your strings alone could solve your intonation problems. Also, it is impossible to properly set your intonation with old, worn out strings. If your intonation needs to be set, you will have to replace then anyway, so you might as well replace them now. Check out this page for more information about how to restring your guitar.
Adjust Your Guitar Intonation by Compensating the Nut
Scale length compensation simply means shortening or lengthening the scale length until the intonation is properly set. This repair can be done on the nut of your electric guitar. The adjustment can be relatively easy or relatively complicated depending what kind of nut your electric guitar has. No matter what kind of nut your electric guitar has, it will probably be easier to adjust the intonation at the bridge of your electric guitar. I just want to mention this adjustment and walk you through the repair steps.
Fender styled nut compensation
On a Fender inlayed nut, you will need to remove the nut from the nut slot. Sometimes removing a guitar nut can be tricky, so check out my nut removal page for more details. Once the nut is removed from the slot in the fretboard, you will need to file one of the sides of the nut slot according to our intonation guide above. This will either shorten or lengthen the fretboard. Once the nut slot is bigger, you can either make a new nut to fit in the bigger slot or you can place a shim on the side of the old nut and glue it in place. I prefer to make a new nut that fits the slot. There are a lot of tonal advantages to have a good snug fitting nut. Plus, it just looks nicer. Now that you have a wider nut you will need to compensate it by filing the vertical edges of the part of the nut that is sticking out of the fretboard. This will lengthen the fretboard as needed. For more information about removing and replacing electric guitar nuts, check out my the nut replacement page.
Gibson style nut compensation
A Gibson style nut is much easier to remove and compensate than a Fender style inlayed nut. The Gibson nut can be removed by placing a piece of wood against the nut on the fretboard. You can gently hit the piece of wood with a hammer and the nut will pop right off. I say this with EXTREME caution. It sounds like an easy job. It probably will not go as easily as I just described it. For more information about removing and replacing the nut on your electric guitar, please see the electric guitar nut replacement page. Once the nut is removed, you will need to file down the fretboard accordingly. You must be very careful doing this as well. You only want to shorten the fretboard a little bit. Too much shortening of the fretboard can ruin the nut placement entirely.
Pre-made Compensated Nuts
For beginners, I would suggest getting a nut that compensates itself over the fretboard. Earvana makes nuts that are made to hang over the top of the fretboard in order to compensate the scale length. Buzz Feiten also makes a system to compensate your nut.
Either way, only the most trained ears can hear the intonation problems on a standard nut. Unless you are a professional or have perfect pitch, I probably would not worry about trying to compensate the nut on your electric guitar. I would adjust the intonation on your bridge. It is much easier and will fix most of your intonation issues.
Adjust Your Guitar Intonation by Compensating the Bridge
Scale length compensation simply means shortening or lengthening the scale length until the intonation is properly set. As you look at your bridge, you can see that the saddle pieces are not in a perfect line. Some are closer to the fretboard and some are farther away. You can adjust or compensate the scale length by moving the saddle pieces closer or farther away from the fretboard.
If the fretted 12th fret plays flat compared to the harmonic 12th fret, the scale length needs to be shortened and the saddle should be adjusted toward the fretboard. 12th fret flat = move saddle closer to the fretboard
If the fretted12th fret plays sharp compared to the harmonic12th fret, the scale length needs to be lengthened and the saddle should be adjusted away from the fretboard. 12th fret sharp = move saddle away to the fretboard.
Different Styles of Electric Guitar Bridges
There are many different styles of bridges and each style has its own unique way to adjust the saddle pieces. Here is a list of the bridges that I will show you how to adjust:
- Fender Stratocaster/ Telecaster
- Gibson Les Paul/ Tune-o-matic
- Floyd Rose
- PRS style wrap-around
Adjusting the intonation on a Fender style bridge
Fender has made many different styles of bridges throughout the years, although the basic design of the bridges has stayed the same. Each string is strung through the body or bridge and mounted on top of a saddle piece. The saddle pieces can be adjusted toward or away from the top of the body as well as toward or away from the fretboard. Tightening or loosening the screws that attach the saddles to the back of the bridge can adjust the saddles and saddle pieces toward or away from the fretboard. The screws should be tightened or turned clockwise if the fretted note on the 12th fret plays sharp. The saddle pieces will move away from the fretboard the tighter the screw is turned. If the fretted note on the 12th fret is flat, you will need to loosen or turn the screw counterclockwise to move the saddle toward the fretboard. Only turn the screw slightly. You don’t have to move the saddle pieces very much to adjust the intonation. If you turn the screws too much, you will just have to turn them back the other way. It is easier to adjust them in small increments than trying to make the adjustment all at once. To adjust the intonation on a Fender style bridge, follow these steps:
- Tune the guitar to pitch with a tuner
- Adjust the truss rod to straighten the neck
- Tune the guitar with a tuner again after the neck is straightened.
- Hold the guitar as if you were playing it. Gravity pulls on the strings differently as the guitar is oriented different ways. You want to set the intonation in the position you will be playing the guitar.
- Check the harmonic on the 12th fret and the fretted note on the 12th fret with a tuner. Both of these notes should be the same–the tuner’s needle should not move at all when the notes are played back to back.
- Use a screwdriver to tighten or loosen the screws that attach the saddles to the backside of the bridge as needed to adjust the intonation.
- Put the guitar back in playing position and replay the fretted and harmonic notes in a tuner to see if more adjustment is necessary.
- Repeat steps 4 through 7 until both the fretted and harmonic notes are in tune on all of the strings.
Adjusting the intonation on your Gibson or Tune-o-matic bridge
The Gibson or Tune-o-matic bridge is much different than the Fender style bridges. The Gibson or Tune-o-matic style bridge has a stoptail and a bridge piece. The stoptail is the piece of the bridge that the strings are strung through and anchored to the body. The bridge is the piece that holds the saddles and intonation pieces. The same principles about saddle movement that apply to the Fender style bridges also apply to the Gibson or Tune-o-matic style bridges. The only difference is how you adjust the saddle pieces toward or away from the fretboard. On the Gibson or Tune-o-matic style bridges the saddle pieces are attached to screws that are threaded through the bridge piece. When the screws are tightened or loosened, the saddle pieces move forward and backward. To adjust the intonation on a Gibson or Tune-o-matic style bridge, follow these steps:
- Tune the guitar to pitch with a tuner.
- Adjust the truss rod to straighten the neck
- Tune the guitar with a tuner again after the neck is straightened.
- Hold the guitar as if you were playing it. Gravity pulls on the strings differently as the guitar is oriented different ways. You want to set the intonation in the position you will be playing the guitar.
- Check the harmonic on the 12th fret and the fretted note on the 12th fret with a tuner. Both of these notes should be the same–the tuner’s needle should not move at all when the notes are played back to back.
- Use an allen wrench to tighten or loosen the screws that the saddles are riding on.
- Put the guitar back in playing position and replay the fretted and harmonic notes in a tuner to see if more adjustment is necessary.
- Repeat steps 4 through 7 until both the fretted and harmonic notes are in tune on all of the strings.
If you have adjusted the intonation pieces all the way to one side and the string is still not properly intonated, you may have to take the intonation piece out of the bridge and flip it around, so it is facing the other direction. This will give you a little more adjusting room.
Adjusting the intonation on your Floyd Rose style bridge.
The Floyd Rose bridge is a completely different animal altogether. It is important to have this bridge set up properly before trying to adjust the intonation. Otherwise, you may have to adjust the intonation again after you set the bridge up properly. Out of the bridges discussed thus far, the Floyd Rose bridge is far more time consuming to set the intonation. On a traditional Floyd Rose bridge, the strings are placed inside of the saddles and secured with a setscrew that clamps the string in place. On a Floyd Rose bridge, the entire saddle piece is anchored to the bridge with a screw that rides in a slot notched in the saddle. To move the saddle toward or away from the fretboard, you will have to loosen the tension on the string then loosen the screw that holds the saddle on the body. Once the screw is loosened, you can slide the saddle back and forth. After you have adjusted the saddle toward or away from the fretboard, you can tighten the screw and bring the string back up to pitch and check the intonation. To set the intonation on a Floyd Rose bridge, follow these steps:
- Tune the guitar to pitch with a tuner.
- Adjust the truss rod to straighten the neck.
- Tune the guitar with a tuner again after the neck is straightened.
- Make sure the Floyd Rose bridge is properly set up. For more information about setting up a Floyd Rose bridge, please see the Floyd Rose bridge set up page.
- Hold the guitar as if you were playing it. Gravity pulls on the strings differently as the guitar is oriented different ways. You want to set the intonation in the position you will be playing the guitar.
- Check the harmonic on the 12th fret and the fretted note on the 12th fret with a tuner. Both of these notes should be the same–the tuner’s needle should not move at all when the notes are played back to back.
- Once you have an understanding which way the saddle needs to be adjusted, toward or away from the fretboard, loosen the tension on the strings.
- Use an allen wrench to loosen the screw that attaches the saddle to the bridge.
- Push the saddle toward or away from the fretboard and tighten the screw that clamps the saddle to the bridge.
- Bring the string back up to pitch.
- Put the guitar back in playing position and replay the fretted and harmonic notes in a tuner to see if more adjustment is necessary.
- Repeat steps 6 through 11 until both the fretted and harmonic notes are in tune on all of the strings.
As you can see, the Floyd Rose bridge takes quite some time to adjust the intonation. That is why you want to make sure the bridge is properly set up before you start the intonation adjustment. You don’t want to have to adjust the intonation twice. For more information about properly setting up a Floyd Rose bridge, see the Floyd Rose bridge set up page.
Adjusting the intonation on your PRS style wrap-around bridge
The PRS style wrap-around bridge that is adjustable is similar to the Gibson style bridge except the PRS style bridge combines the bridge and stoptail pieces together. Rather than having the strings strung through the stoptail and the saddles anchored in the bridge, the PRS style bridges have the strings strung through the bridge away from the fretboard, wrapped around the backside of the bridge, and set on top of the saddles that are anchored in the bridge. Not all PRS style wrap-around bridges have adjustable intonation. The intonation can only be adjusted on bridges with movable saddle pieces. The steps to adjusting the intonation on the PRS style wrap-around bridges are almost exactly the same as the steps for adjusting the intonation on the Gibson style bridges. These bridges are basically identical for this setup. To adjust the intonation on a PRS style bridge, follow these steps:
- Tune the guitar to pitch with a tuner.
- Adjust the truss rod to straighten the neck.
- Tune the guitar with a tuner again after the neck is straightened.
- Hold the guitar as if you were playing it. Gravity pulls on the strings differently as the guitar is oriented different ways. You want to set the intonation in the position you will be playing the guitar.
- Check the harmonic on the 12th fret and the fretted note on the 12th fret with a tuner. Both of these notes should be the same–the tuner’s needle should not move at all when the notes are played back to back.
- Use an allen wrench to tighten or loosen the screws that the saddles are riding on.
- Put the guitar back in playing position and replay the fretted and harmonic notes in a tuner to see if more adjustment is necessary.
- Repeat steps 4 through 7 until both the fretted and harmonic notes are in tune on all of the strings.
What Causes Poor Guitar Intonation?
There are almost an infinite number of possible causes for your guitar’s poor intonation. The design of a guitar is specific and mathematical. If any one part of the guitar is not installed or setup properly, your guitar may suffer from poor intonation. I have listed a few common causes of poor intonation. If you are having intonation problems, you can evaluate the following causes. Chances are, your guitar has one of these problems and can be fixed fairly easily.
Causes of poor intonation:
Faulty strings
It is not common to open a new set of strings from a manufacturer and find out they are bad, but it happens. Strings that are not made properly will not stay in tune and will sound “dead.” These strings may also not allow proper intonation. Old, worn strings may also have intonation issues. That is why before you go any further in the article you need to replace your strings with new ones. Replacing your strings could solve your intonation problems. Also, it is impossible to properly set your intonation with old, worn out strings. If your intonation needs to be set, you will have to replace then anyway, so you might as well replace them now. Here’s more info about how you can to restring your guitar
High action
High action is often the cause and/or symptom of many problems with guitars. High action can be caused my any number of problems–one being extreme neck relief talked about in the next section. Excessively high action can cause poor intonation because the strings are required to be “bent” or pushed down to the fretboard farther than intended. On a guitar with low or normal action, the string barely bends as it is pushed down to the fretboard because of its close proximity to the fretboard. On a guitar that has extremely high action, the string has to travel further and be bent more in order to touch the fretboard. This excessive travel distance causes the string to bend in the same way as if you were bending a string while playing a note. The bend sharpens the pitch of the string and causes poor intonation. High action set at the nut is even worse than high action set at the bridge. If the nut action is high, chords and notes played in the first few fret may sound out of tune. The higher notes on the fretboard will sound even worse than the lower notes. To learn how to set the action on your electric guitar, please visit the action adjustment page.
Extreme neck relief
As mentioned in the high action section, extreme neck relief can cause high action, which in turn causes poor intonation. When the neck bows away from the strings, it creates a larger gap in between the strings and the fretboard–hence, the high action. To check whether your neck is flat or has relief, you can turn the guitar sideways and look down the side of the fretboard on both the treble side and bass side. If you have a hard time eye-balling the straightness of your neck, you can fret the low E string on the first fret and the fret where the body and neck meet. Your string will act as a straight edge and you should easily be able to see whether your neck has relief. For more information about straightening your neck, check out my truss rod adjustment page.
Intonation pieces are not properly set or positioned in the bridge
The intonation or saddle pieces are the parts of the bridge that the strings rest on top of. Most electric guitars have bridges with adjustable intonation pieces. These intonation pieces can be adjusted toward or away from the fretboard. The closer the intonation pieces are to the fretboard, the sharper the pitch will be. Each strings’ intonation piece needs to be set individually. Most likely none of the intonation pieces will aligned with adjacent intonation pieces. Not only is the distance between the intonation pieces and the fretboard important, but also the intonation pieces themselves might be placed incorrectly in the bridge. This problem is rare because most electric guitar bridges are machined and have no handmade pieces to them, so everything fits together smoothly. Nonetheless, the bridge might be manufactured properly but assembled incorrectly. For more information about adjusting intonation pieces, take a look at the Fender section of this guitar intonation page.
Nut is not properly set
Just like the bridge, the nut can cause intonation problems. The nut can be worn down or damaged, which I will talk about in a later section. The nut can also be place improperly. If the fretboard is too long, making the nut farther away from the 12th fret, the scale length will be too long for the fret placement. In order to fix this problem, you will need to compensate the nut. The nut may also be set too high. As I discussed in the high action section, your guitar may have poor intonation because the nut needs to be filed down. Filing down the nut will lower the action and hopefully fix the intonation issues. For more details on how to properly set your nut, please see the nut compensation sections and the nut-filing page.
Scale length and Fret placement errors
You may wonder why your higher frets are closer together than your lower frets. The fret placement is mathematically calculated depending on you guitar’s scale length. Obviously, each fret represents a half step in the chromatic scale. The frets are inlayed in the fretboard exactly where the half steps are located when the string is plucked. If any of these frets are not inlayed in the correct place, that half step will not play in tune with the rest of the guitar. The only way to fix this problem is to pull the fret or frets and inlay them in the proper mathematical sequence. For more information about re-fretting a fretboard, check out my guitar refretting page.
Frets not properly seated in the fret slots
Frets are designed to have the tang or lower portion of the fret inlayed in the fretboard and the crown or upper portion seated flat on the fretboard. There are numerous reasons why the frets are not seated properly. One of the main reasons for improperly seated frets is traumatic damage to your guitar. If you drop your guitar or hit it up against something, the fret ends get damaged and loosen the fret in the fret slots. The frets can also be shifted in the slot. Usually frets are secured in the slots with extremely strong glue but hitting them the right way can cause the frets to come loose. Another reason frets are improperly seated is faulty craftsmanship. The fret slots may not be deep enough for the fret tangs. If the fret tangs bottom out too soon in the fret slots, the crown will not sit properly on the fretboard. Raised frets can cause intonation and fret buzz issues for the same conceptual reasons that high action causes intonation problems: the string is bent farther than it is designed to bend when the string is fretted. Guitars with high frets tend to play sharp. The same tuning problem can happen easily on a scalloped neck guitar. If the strings are pressed on the frets too hard, the notes will be sharpened. To test this on your regular fretboard, play a note “normally.” Now, play the same note only push down on the fretboard harder. The note will be raised or sharpened. For more information about fretting a fretboard, check out my guitar refretting page.
Worn or damaged nut and frets
Worn frets and nuts will affect the intonation on your guitar. A worn down nut will affect the string length because the string will no longer be resting on the nut in the desired position. Bone, horn, and plastic nut are obviously easier to warn down than a metal nut on a guitar with a Floyd Rose setup. The string is not actually supposed to sit flat across the face of the nut. It should sit on a point toward the fretboard side of the nut. Once the nut gets worn down, that point starts to flatten out and the string starts to rest on a different part of the nut. That is how the string length changes. In order to fix the nut you will have to refile the nut or replace it depending on how worn down it is. For more information about nut repairs, see the how to replace your electric guitar nut page.
Worn frets can also cause intonation problems. After a while of playing your guitar, you may notice that the frets start to have grooves where they come in contact with the strings. The frets are actually being filed away by the friction of the strings. This can happen fast or slow depending on what gauge strings you use, the material the strings are made of, and the hardness of the frets. Stainless steel frets will last for a lot longer than nickel frets. Once the frets are worn enough to create large grooves in the frets, the intonation will be out for the exact opposite reason as the frets that were too high. To fix the intonation problem with worn frets, you will need to dress or replace the frets depending on how severe the wear is. For more information about how to dress your guitar frets, please see the fret dress page.
Changing to different string gauges or tunings
Your intonation can be affected if you change to different string gauges. Many metal bands like to tune their guitars down to C and B. This down tuning reduces the tension on the neck and can warp the neck in different ways. Many guitarists try to combat the lack of tension in these drop tunings with higher gauge strings. The higher gauge strings create more tension on the neck and can warp the neck in a different way. Don’t be alarmed. If you are doing this with your guitar, you probably aren’t ever going to hurt anything. You just need to properly set up the guitar when you change to the heavier gauge strings. I, however, would not flip back and forth between extremely heavy and extremely light gauges strings on a regular basis. It is not good for the neck to have that much change in tension all the time–not to mention it is a pain to setup every time. For more information about changing to heavier gauge strings, see the setup my guitar with heavier gauge strings page. After you intonation is perfect, it’s time jam or maybe learn from some free online guitar lessons

These instructions are extremely difficult to follow because there are no illustrations. For example, in the section, “Fender styled nut compensation” you mention making a new nut, but you don’t explain how to make a nut. I have never heard of this, so it is difficult to picture what you are talking about. Do you have to be a machinist in order to make a new nut? Also, “you will need to file the nut slot according to our intonation guide above” but it’s difficult to find which section “above” to refer to. Thank you
Amen Frank T.
Thanks for the information! So if I have the intonation set properly at the 12 fret (by adjusting the bridge saddles), but the intonation is still off in other areas of my neck then I should look at other areas to fix the issue (nut, action)?
sounds like a truss rod adjustment might be needed. Are the strings higher off the fretboard at the 6th fret than at the 12th? If so, neck needs adjustment.
the only thing need to be illustrated here is the direction of scale compensation which is missing.
Hi, not sure what this means
Simply grab a tuner and tune all of your strings at the harmonic on the 12th fret: E A D G B e.
It says later to compare this with a fretted note on 12th fret.
I can tune the open strings, my problem is with string tuned open, the 1st fret note is sharp and remains sharp all the way to 12th fret
Thanks for very interesting and useful site