
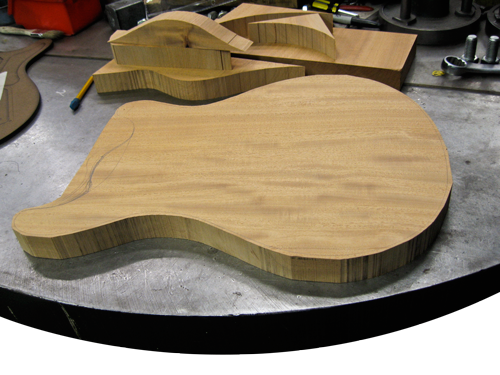
Now that I have the PRS body cut out, I can start the planning stages of cutting out the body cavities. There are several different designs that I have considered using. There are also several different factors that I need to take into consideration before I start routing all the sweet Honduras Mahogany away.
First, I should probably start with why I’m building a semi-hollow body PRS. I like semi-hollow electric guitars for their unique sound. I have had several thin-line Teles in the past and loved them. I also like the weight difference. Mahogany is a pretty lightweight wood, all things considered, but I wanted to lighten it up even more because I plan to use a solid Macassar ebony neck. You might think that the body would be unbalanced, similar to an SG, with a heavy neck like this, but that’s not the case. I am going to cut a really deep pocket for the neck. It will almost be a neck-thru design, so some of the weight of the neck will be in the body itself.
Second, you need to think about tuning the wood. Some luthiers’ say that the only reason to make a semi-hollow body electric is to tap tune the wood. You can remove enough material from the back, top, and neck to tune the wood together. This is an entire art form in and of itself. We can talk about that in another article.
On to the build!
Routing out the PRS Body Cavities
Contents
PRS Semi-Hollow Design
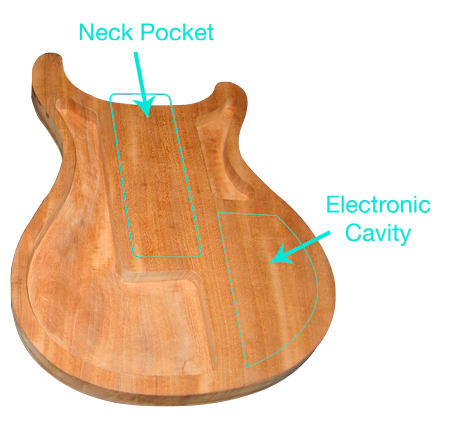
Obviously, you have to pick your routing design before you can do any routing. I chose to route two large pockets in the front of the guitar back. Notice that the large pocket is the side of the guitar without any controls or electronics. This is important because the electronic cavities will be routed in the back of the body–not the front. The smaller pocket creates just a little more “semi-hollowness” to the body.
I chose to keep a thin half-inch wall around the outside of the body. I think this will maintain enough structural support for the guitar once everything is glued up. Notice I have a large area in the middle that I left untouched. This is for the bridge, pickups, and most importantly the neck. The will be extended all the way down to the bridge. Both pickups will be mounted on the neck for great sustain.
PRS Body Template
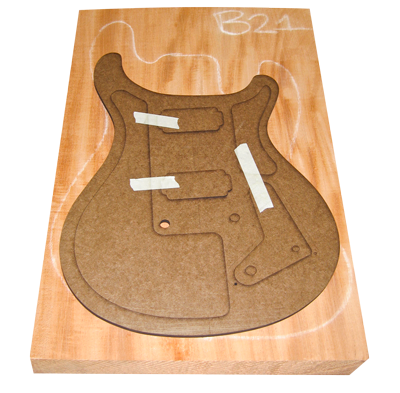 Whenever you are routing something, it is extremely important to make a template. Freehand routing is really impossible if you want to do a good job. I drew my template out on a piece of plywood and cut it out in the band saw.
After it was cut out, I sanded and shaped it until it was perfectly smooth and ready to go.
Enough about the setup work; let’s start routing!
Routing Semi-Hollow Body PRS
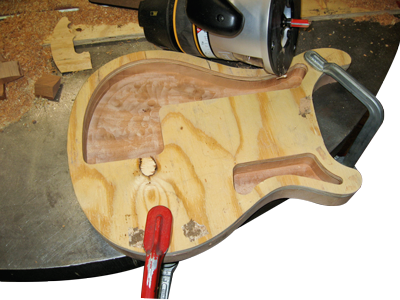
I like to attach my template to the body with a little double-stick tape. That way I know that it won’t move on me. Double-stick tape works great, is easy to remove, and won’t hurt your wood or the template.
Clamp the Body Down
Once the template is on, I clamp the body down to a workbench. I have to warn you. DON’T just clamp your body down on the workbench. Make sure to clean it first. Even the slightest amount of wood chips will create big dents in your body if you are not careful.
After the body is secured to the workbench, it’s time to route it out! This is always the most exciting part! I have a few different routers. For this job, I grabbed a small 2HP craftsman with a flush cut Freud bit. The router bit cutters are exactly flush with the bearing on the top. The bearing rides on the template and gives me a nice smooth cut.
Set the Router Bit
I set the router, so there is about a quarter inch left of material on the back of the guitar. This is easy to do. I just put the router on top of the body and let the bit hang off over the edge. That way I can see how deep the bit is cutting into the wood. Then I just raise or lower it until I have the proper depth. Keep in mind that the router sits on the template when you are routing out the body. You have to make the bit extra deep to account for the router.
Start Routing!
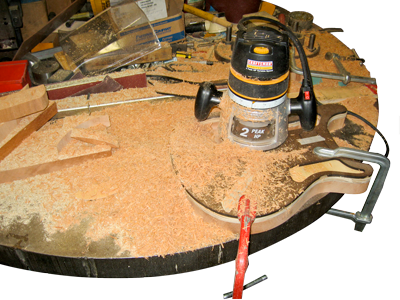 Now that everything is all setup, it’s time to route. I start in the middle and slowly work my way to the edges in a circular pattern. Keep in mind that your router bit blades are spinning is a clockwise motion.
This means that the router will cut differently if you go around the pattern clockwise or counterclockwise.
Sanding the Body Cavities
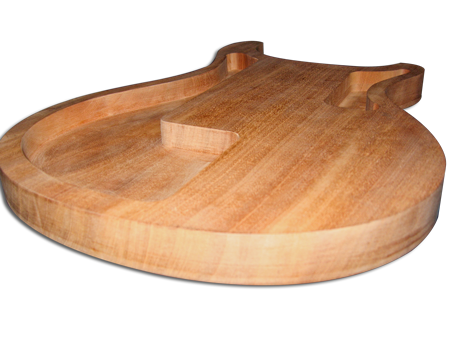
Once the PRS body cavities are routed out, I can start sanding them smooth. There will inevitably be some ridges and marks from the router either on the floor or walls of the pockets. I usually take 80-grit sand paper and smooth out the ridges in the cavities. 80-grit will take out the ridges will little work. In order to make sure I sand everything flat, I take a flat piece of wood–a cutoff from the body and wrap it with sandpaper. This makes a little sanding block that will fit in the cavities. Then I bump it up to 120, 240, and 320-grit. I don’t think there is a reason to go past 320-grit sand paper. You are only going to see this part through a small f-hole.
Now my PRS body is routed out! It is starting to look amazing. I can’t wait to start routing and shaping the maple top.
Hi! I would like to know if you could share the routing plans for this particular build. I am interested on building my own semihollow guitar, and to be exact, this model.
Thanks, Gerard.