
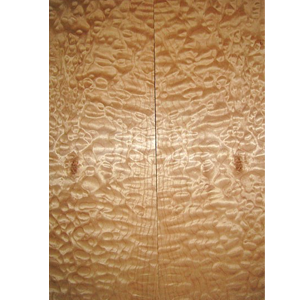
 I wanted to make a beautiful, highly quilted maple top on this PRS guitar. In order to accomplish this I bought a two inch thick piece of maple that I could book-match. Most high quality PRS guitars have book-matched tops. Book-matching not only makes a guitar look 10 times better than just having a solid piece of wood, but it also requires less wood to build a guitar. I, like modern luthiers, am concerned about the health and longevity of our world’s wood supply. Book-matching tops is a great way to conserve wood.
The book matching process starts by splitting a piece of wood in half. The wood is then opened like a book showing symmetrical grain patterns. It not only looks great, but it also doubles the size of your wood! Here’s how I got started.
Cutting and Planing the wood
Contents
First, I cut my 2 inch thick piece of maple down the middle. I used a band saw to do this, but don’t worry if you don’t have a band saw. You can just buy a piece of already book-matched wood. Then I planed the wood in order to keep it flat and remove the saw marks from wood cutting process.
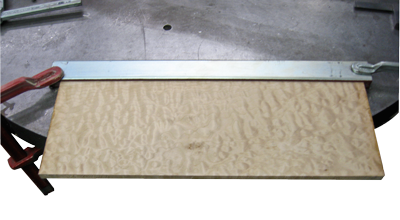
The body should be flat and level before you can glue it together. I could have just used my planer to plane the guitar body, but I wanted to show you how to plane you guitar without an expensive planer.
I used one of my leveling bars to plane this guitar back. This technique is just as effective as a planer but less costly and efficient. I simply clamped the guitar body blank to my workbench and covered the top of the body blank with pencil lines. Next, I put 80 grit sand paper on my 24″ leveling bar and sanded the top until the pencil lines disappeared. I blew off the body blank and repeated this sanding process a few times on both sides of the body until the leveling bar was hitting all parts of the guitar body at the same time. During this entire process, I was checking the body with a Caliper to make sure I was sanding evenly.
Jointing My PRS Top
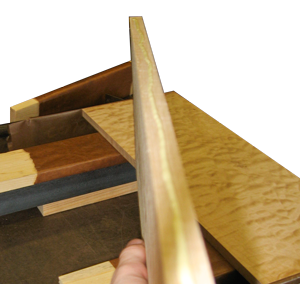
The most difficult part about making a book-matched top is creating a nice, tight joint. I could use my jointer to joint my boards and create the perfect gluing surface, but I decided not to for this project. Since most people don’t have this kind of equipment, I wanted to show you how you can make the perfect joint with nothing more than a couple clamps and my fret leveling bars.
I started by clamping my fret leveling bar down to the table with the sand paper sitting perpendicular to the surface of the table. After the fret leveling bar was clamped down, I simply slid the wood back and forth against the leveling bar. Obviously, this took longer to do than using a jointer, but I wanted to show you that it can be done without a big expensive planer or sander.
Checking My Joint
During the jointing process, it is important to check your joint to see if you are sanding it properly. You can place a straight edge against the edge of your to see if it is flat. I typically don’t use a straight edge. Usually I just hold both pieces of wood together and hold them up to the light. If there is light shining through, I know I need to keep going. You really want the joint to be tight without any gaps. A poorly jointed joint will not only be unstable, you will also be able to see glue in the gaps once the guitar is finished. Once I can’t see light shining in between the two top pieces, the top is ready for gluing!
Gluing My PRS Maple Top
In my opinion, a well jointed and jointed top is one of the most prominent aesthetic features on an electric guitar. A glue joint that is tight and solid, is not only beautiful, but it also makes the jointed top stronger than a solid top.
Dry Run
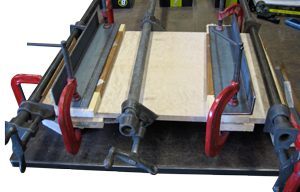
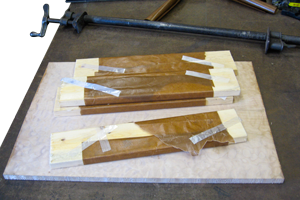 To start the gluing process, I set up my clamping system. I simply use a few pieces of angle iron, four 1 x 4’s, and a couple pipe and f-clamps
. Notice that I wrap the 1 x 4’s in wax paper. The wax paper keeps the guitar wood from gluing to the clamping system. After I get the clamping system all set up, I test it out. It’s a good habit to get into. Always do a “dry run” before you actually put glue on your wood. This way you will know if you need to adjust your clamps.
Applying the Glue
After I clamped the wood in place and saw that the joint was nice and tight, I remove the clamps and prep the wood for glue.
Since both pieces of wood don’t need to be glued, I leave one piece of maple in the gluing jig and remove the other one to apply the glue. I simply place a small bead of Titebond Wood Glue down the middle of the piece of maple. Most beginners think that you need to slop on a lot of glue in order to get a good joint. Really all that does is make it messier to clean. You just need enough glue to show some squeezing out of the joint once it’s clamped. You’ll see.
After I glue the piece of maple, I carefully line it up with the other piece. This is probably the most important part of gluing a top. Remember the whole book-matching concept? Well a book-matched top only looks good if the grain pattern is lined up and both sides are symmetrical. I pay close attention to the grain at the joint when I am gluing the top. I also like to put stops on the top and bottom of the wood, so it can’t slide when I clamp it together.
Clamping the Maple Top.
After the wood is glued and in the fixture, I start clamping it down. Like I said before, I watch the grain at the joint to make sure the wood doesn’t shift on me. I usually clamp the body with three clamps going horizontally and a couple clamps holding the wood flat. Once I start tightening the clamps, glue starts squeezing out of the joint. This is a good sign! After I tighten it down to what I want, I usually use a damp paper towel to remove the excess glue or squeeze. Always make sure you clean the squeeze out when it is still wet. It’s a pain to chisel off later. Believe me. I know from experience.

Let it dry
After the squeeze out is all cleaned off, I will let it sit over night. Titebond is a wood-glue that will dry in just a few hours, but I usually like to leave it over night. It just gives the glue time to harden and the wood time to adjust.
Let’s cut out the top!
After the glue is dry, I’ll remove all the clamps and plane/sand the top one more time. This ensures that the body is flat and the excess glue is removed. I just like to clean up the wood before I start working with it. Now I am ready to start cutting out the top!
On to the Building Phase!
Time it cut out the body and start shaping it. I can’t wait!