
Probably the most important and functional part of building a workshop is the layout. Ask any woodworker or luthier about their shop. The layout is key. Layout and placement controls what you can put in your shop as well as how well you can work in it. Unfortunately, we all don’t have huge places to setup shop in. Sometimes you have to work with what room and dimensions you have. Don’t worry. There are all kinds of ways to create more space with a little foresight.
Needless to say, the layout of your shop will help create something awesome or something very frustrating. Let’s take a few minutes and sketch out what I am working with and what I think is important to have in my shop.
What to include in a guitar workshop
Contents
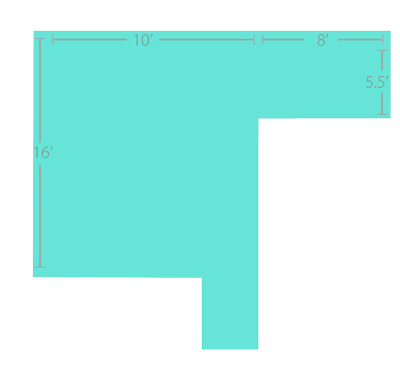
Here is a blueprint of my soon to be workshop. As you can see, it’s kind of an odd shape. Basically, it’s the utility part of the basement. The furnace and hot water heater are down the hallway at the bottom and the laundry room is down the hallway at the top right. Unfortunately, I also have the oil tank in the main part of the room that I have to deal with. Don’t worry. I have a plan to turn the oil tank into one big shelving unit! I need come up with a layout for the rest of the shop that is functional as well as one that fits all of my stuff in it. First, I need to figure out what I want in the shop.
Guitar Repair Bench
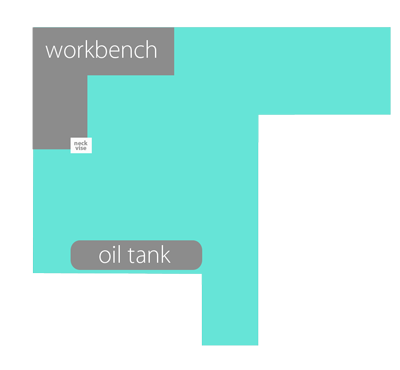 The main and most important thing in this shop and probably any guitar shop is my workbench. I decided that I wanted to make a huge workbench. That way I will have plenty of storage with drawers and shelves as well as bench top spaces for tools, boxes, and guitars. As you can see, my guitar workbench is a 7-foot corner style bench. It measures 7 feet from each end to the corner of the room. It’s also 36 inches tall and a generous 30 inches deep. This way I can easily have a guitar on the top of the workbench and have plenty of room around it for tools. You can also see my guitar neck vise on the corner of the workbench.
I designed this workbench to be my ideal work area. It’s incredibly sturdy as well as good looking. I have seen all kinds of workbenches over the years. Some were fancy, but most of them just looked like a bunch of 2x4s screwed together. It might be just me, but I take pride in my workbench. It’s the place that I see and go everyday. Maybe more importantly, it’s the place that all my clients come to see their guitars. I want it to be functional as well as good looking. I’m in the process of writing an eBook about how to build my workbench. Check it out and get some ideas for yourself!
Power tools
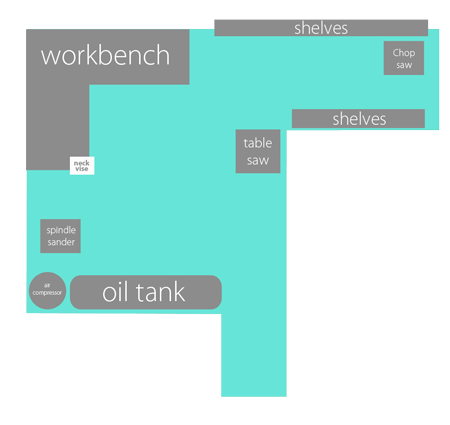 The next big item in any workshop is tools. What tools are you going to include and how big will they be? Sometimes the tools themselves aren’t too big, but they require a lot of area in order to use them–like a table saw. Since I am dealing with a pretty small space, I have decided to only include a few of the main power tools. Normally, I would include a band saw, table saw, spindle sander, sand belt, radial arm saw/ chop saw, air compressor, and dust collector. Unfortunately, I don’t have room for all of these basic tools, so I am going to keep some in the workshop and the rest in the garage.
Spindle Sander
As you can see from my diagram, I’ll have the spindle sander set up in the lower left corner. That’s because it doesn’t require much room to operate.
Table Saw
The table saw will be next to the wall in the middle of the room. Remember, a table saw needs room on the sides but even more room on the front and back. I can use the length of the room to run boards through this saw. If I need more room for a wide board, I can always more it away from the wall.
Radial Arm Saw
My radial arm saw will be at the top of the room against the wall. This will put it out of the way and I’ll have the length of the wall in case I need to make long cuts.
Router Table
Do you notice anything missing from my list or the diagram? You got it. There’s no router table! Since I don’t use a router table that often, I decided that I didn’t want to have a separate table solely dedicated to routing. So, I am actually going to make a built in router table in one side of my workbench. I’ll have one removable piece of bench top material that can be replaced by a router plate. This way I don’t have another table sitting around in my shop.
Outlets and Lights
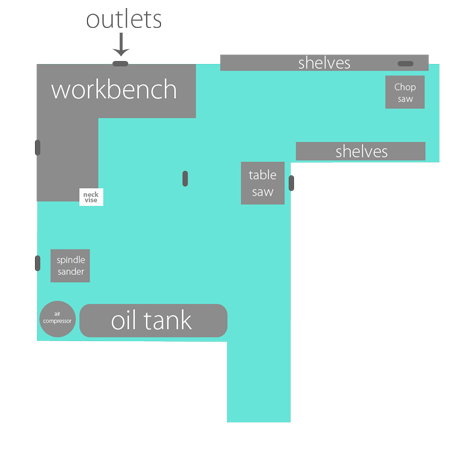 Since I starting this workshop from a completely unfinished basement, I also have to think about the layout of lights and outlets. Right now, there are no outlets and one pull-chain light in this room. I’ll have to wire in all new lights and outlets.
Here is what I’m thinking. I want to put an outlet next to all of my tools. That way I never have to have any cords running across the floor or ceiling. I also want an outlet on top of each side of the workbench. This will be great for plugging in hand tools like sanders or soldering irons. I also want an outlet in the ceiling in the middle of the room just in case I need to plug something in real quick. The general rule of thumb is you can’t have too many outlets or lights in a workshop.
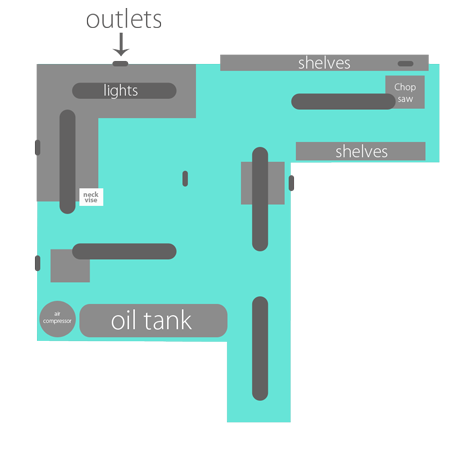 Another extremely important part of any workshop is the lighting. I decided to use 48″ T-8 fluorescent lights in my shop. These are bright, white, last a really long time, and save electricity. Here is where I am going to put the lights. I want one above each workbench as well as one above each main tool.
So that’s it. That is going to be the layout of my new in home workshop. I hope this helped you and gave you some ideas about laying out or adding to your guitar workshop. I’m excited; I get more ideas every time I think about it! Now it’s time to get started building. I have a ton of work to do. Check out my progress in the next article.