
Out of all of the floating tremolos available today, the original Floyd Rose bridge is probably the most stable and easiest to play. Tons of guitar companies have made their own Floyd Rose style bridges like Ibanez, but the original Floyd is still viewed by many as the best. Although the Floyd Rose design might be the best floating tremolo system, it still comes with its headaches and frustrations. In this article, I’ll show you how to setup and maintain your Floyd Rose bridge to keep it in tune and playing great.
Get Familiar with Your Floyd Rose Bridge
Contents
- 1 Get Familiar with Your Floyd Rose Bridge
- 2 Change the Strings
- 3 Tune your Floyd Rose Bridge
- 4 How to Tune your Floyd Rose Bridge
- 5 Tune the Guitar
- 6 Stretch the Strings
- 7 Adjust the String Radius
- 8 Adjust the Bridge and String Height on your Floyd Rose Bridge
- 9 Tune your Guitar — Again
- 10 Level your Floyd Rose Bridge
- 11 Adjust the Intonation
- 12 Replace the Cavity Cover
- 13 Replace the Locking Nut
- 14 Related articles:
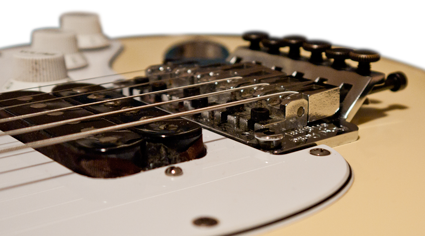
If you have played with a Floyd Rose bridge for a while, you might know what it looks like. You also might not know what all the bridge components are called or how they fit together. Check out my Floyd Rose Anatomy article to learn more about all the parts of a Floyd Rose.
Change the Strings
As with any guitar setup process, it is important to start with new strings. Old strings eventually go dead and can even cause intonation problems. There is no point going through the entire setup process, getting the Floyd Rose bridge situated and then having to undo everything to put new strings on it. It’s best to start with new strings. Here is an article I wrote about how to replace the strings on your Floyd Rose Bridge. Check it out and come back for the rest of the setup.
Tune your Floyd Rose Bridge
Before you attempt to do any kind of setup work on your bridge, you should always tune it up to pitch. You need to see where it sits in the playing position. If you are new to Floyd Rose bridges or have struggled with them for years, you know tuning them can be huge hassle. What is the proper way to tune a Floyd Rose bridge? I don’t know if there is a proper way, but there are ways that work better than others.
Floyd Rose bridges are difficult to tune because they are suspended in the air or float between the tension of the guitar strings and the tension of the bridge springs. When you tune the guitar up to pitch, the back of the bridge gets raised higher off the body. The opposite is true about detuning your guitar. That is why it is impossible to properly adjust this bridge without it being tuned to pitch.
How to Tune your Floyd Rose Bridge
Loosen and remove the Lock Nuts
Most guitars with Floyd Rose bridges also have locking nuts. A locking nut is basically a nut with three threaded holes for small bolts. Three locking pieces are then bolted on top of the nut squishing the strings in between the nut and the locking pieces. This keeps the strings from slipping in the nut when you dive on the whammy bar. Obviously, if you are trying to tune your guitar, the tuners are useless with the locks in place. You’ll have to remove or loosen the locks before you can use the tuners.
Adjust the Fine Tuners
After the locks are off the nut, you will want to adjust the fine tuners on the bridge. Some people suggest unscrewing them as far as possible. I disagree with this idea. If you unscrew them all the way, they will only work one way–sharp. I set all the fine tuners in the middle of their threads. That way I have equal adjustment room on both sides– sharp and flat.
Tune the Guitar
Now that everything is all set you can start bringing your guitar up to pitch. I like to tighten each string a few turns starting with the low E string. Remember, the Floyd Rose is floating. If you try to bring one string up to pitch at a time, nothing will ever get in tune. The bridge will keep shifting on you. Turn each tuner a few turns until the back of the bridge starts to rise from the string tension. When you get about a whole step low on each string, you can start bringing them up to tune. Don’t try to overcompensate by making strings sharp. Logically, you might think this would work, but it doesn’t. It is much faster to tune everything up to pitch– not down. It might take you a few times going from low E to high e before the bridge finally levels off.
Stretch the Strings
When the bridge finds its floating place, the strings should all be in tune. Now you can stretch the strings. Stretching your strings will help keep them in tune better later on. Once the guitar is in tune, I like to place my thumb flat on the top of the string and my fingers on the bottom of the string–kind of like playing fingerstyle. Then I just push down with my thumb and up with my fingers. I like to start at the bridge and bend the string a few times going down the neck. It’s important to do this to all the strings. Stretching the string will initially make your guitar go out of tune, so you’ll have to retune it one more time.
Adjust the String Radius
In order to completely set up any guitar bridge you have to check and possibly adjust the string radius. Since Floyd Rose bridges don’t really have adjustable string radii, this is not usually a problem. You should at least check the radius with a gauge to make sure everything is fine. Simply get the same radius gauge as your fretboard and place it on the strings near the bridge. It should equally touch all the strings without having to apply pressure to the gauge.
If one string is too low or high, it is a little more involved to fix than a Fender or Les Paul bridge, but it can be done. I have a complete article about this. Check out how to adjust the string radius on your Floyd Rose bridge. If your string radius looks fine, let’s move onto adjusting the bridge height.
Adjust the Bridge and String Height on your Floyd Rose Bridge
Before we start adjusting the height of your bridge, it’s important to make sure your guitar neck is straight. Guitar bridge height is only one thing that affects the overall action on your guitar. Learn how to straighten your guitar neck with my truss rod adjustment article.
After we know the neck is straight, we can measure the height of the bridge. Start by measuring the string height at the 12th fret. Place a ruler on top of the 12th fret and measure the distance between the top of the 12th fret and the bottom of the string. Your high e string should measure 2/32″ and the low E string should measure 3/32″ at the 12th fret.
The right string height
high e 2/32″
low E 3/32″
If your strings need to be adjusted, just raise or lower the bridge posts. Most Floyd Rose bridges use take an allen wrench, but some take a screw driver as well. Simply, turn the posts to the right to lower the bridge or turn them to the left to raise it. It doesn’t take much, so turn the posts about a 1/4 turn and measure the progress until you get it right.
Tune your Guitar — Again
With just about every step of setting up a Floyd Rose, the guitar will go out of tune. Retune it after you get the action set right and measure it one more time to make sure it did move on you.
Level your Floyd Rose Bridge
The second to last part in setting up your bridge is leveling it. This is also the step that most people have problems with. Don’t worry. It’s actually really easy. Let’s get started!
Floyd Rose bridges are designed to be parallel with the body. I’m sure you have played a friend’s guitar or seen one at a guitar shop that is at a crazy angle. These guitars are just poorly setup. The bridge or faceplate should be straight with the body. This not only makes it easier for the guitar to stay in tune, it also gives an equal distance for dives both up and down on the whammy bar.
Look at the side profile of the bridge compared to the body. Is it at an angle or is it perfectly parallel? Most of the time the bridge will be at a slight angle. To adjust the angle of the bridge, you’ll have to adjust the bridge’s spring tension. The springs are inside the bridge cavity, so you’ll have to remove the plastic cavity cover with a screwdriver.
After the cavity cover is removed, you should be able to see a few springs, the spring plate, and usually two screws attaching the spring plate to the body. Here’s what you need to do to level your bridge.
Floyd Rose Tilted Forward
If the back of the bridge is tilted up away from the body, you will need to tighten the spring screws. The increased tension on the bridge will bring the back of the bridge closer to the body.
Floyd Rose Tilted Back
If the back of the bridge is tilted into the body, you will need to loosen the spring screws. The decreased tension on the bridge will raise the back of the bridge out of the body.
Be careful when you are tightening and loosening the screws. You don’t need to adjust them too much in order to see a big change in the angle of the bridge. Also, make sure you adjust them the same amount. Your bridge should be flat and level across the body–not angled to one side.
As always, tune your guitar right after you adjust the springs. The bridge angle will change the tuning. Tune it up and see where the bridge sits. If it still needs to be adjusted, tighten or loosen the bridge screws again.
Adjust the Intonation
With any kind of bridge set up, you should always check and set the intonation. Your setup could be perfect, but the guitar won’t be playable without proper intonation. I have written an entire article on how to set the intonation on your Floyd Rose bridge. Check it out for more details and come back for the rest of the set up process!
Replace the Cavity Cover
After you tuned the guitar and know the bridge is level and in the right spot, you can replace the cavity cover. Be careful screwing the screws back into the body. Many people tighten them too much and strip the threads in the body. A trick I like to use is to coat the screws with wax before you screw them back into the body. The wax will help hold them in place and will allow them to be removed without damaging the screw threads.
Replace the Locking Nut
After your Floyd Rose bridge is completely set up, the cavity covers are replaced, and you tuned your guitar one last time, you are ready to tighten down the locking nuts. You don’t have to break your arm on them, but you do want them snugged. This will keep the strings from sliding in the nut slots when you use the whammy bar.
That’s it! Your Floyd Rose bridge is completely set up like a professional guitar tech did it. Your guitar will officially stay in tune and sound great! Now it’s time to plug in your guitar and shred.

A string broke on my evh signature series from the Locking Floyd tremolo and I turn it upside down and the little black piece fell out that holds the string tight and it has a little hole in it which way does it go back in
The hole on the string retainer block (the “little black piece” that fell out) should face the back of the saddle where the string retainer screw will contact the hole.
should a beginner 13 year old have a floyd rose guitar for his first guitar
Noooooooo
When i was 14, i bought a floyd rose and today is actually the day i fully understand my guitar and actually using its true potentials (currently 20yo) . Back then, i was so frustrated about my guitar i eventually abandon my floyd rose and only play my classic lmao. Should’ve learned much much sooner. i think fixed bridge will be much enjoyable in the early learning phase.
Ayden, as a seasoned guitarist I’m going to strongly recommend “no” to starting out on a guitar with a tremolo system unless it’s a non-floating one (non-floating models bend only one way, forward, which gives you the “dive” or pitch down sound but do not rock back which would produce a pitch up sound; these models generally stay in tune without the issues you’d find with floating tremolo systems). I’m fairly new to playing with a Floyd myself and I’ve got a few decades on you — it was never an important part of my playing but now it’s something I want to experiment with. Point is, I learned how to master the guitar first — not the whammy bar. But everyone’s different. If you started now, but learned the right way to set up and tune your Floyd as the author of this article recommends, then you’d likely do well. I guess it depends on how disciplined you are, and only you can answer that question. Whatever you decide to do, good luck — focus on making music first and you won’t go wrong.
Thank you I had never setup floating system before, when I had finished I could not put the guitar down I just to keep playing it felt so good, the while job took me an hour, slowly going through your order of events wow!!!
Don’t start with a floating bridge. I bought my first guitar (Ibanez gio) with one thinking it was a great feature, and have found it can be more of a hinderance. It can sometimes be very frustrating switching between tunings because it requires additional adjustments taking significant time away from my practice.
Ive been playing guitar for about 11 years and i played alot of floyds i understand how they work. If your looking to get one i would recommended getting a cheaper version of a guitar to learn how to properly set them up then once you understand what to do and not what to do then go ahead and get a higher end guitar.