
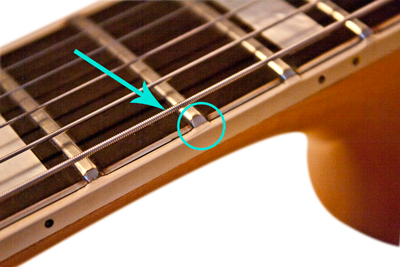
Have you ever heard of fretboard binding nibs or nubs? Don’t be embarrassed. You have probably seen them; you just don’t know what they are actually called. A fretboard binding nib or nub is an extension of the fretboard binding that extends high enough to cover the ends of the frets. On traditional bound fretboards the frets actually extend the full width of the fretboard binding. Nub binding frets only extend the width of the fretboard itself– just like an unbound fretboard. The binding nubs basically act like a decorative fret end cap. Gibson is famous for putting nibs on their Les Paul bound fretboards, but other guitar manufacturers like Rickenbacker and Gretsch do the same thing.
Now you know what binding nubs are, but how do you work with and around them? Refretting and repairing binding with nubs is actually really easy to do, it’s just a little tedious. Let’s get started!
Fretting a Guitar with Fretboard Binding Nubs
Contents
When I am replacing a few frets on a fretboard with nubs, I like to try to keep the nubs in tact. I like to be as conservative as possible with my repairs– only repairing what is broken and not changing the original design. Many repair techs just file these off because they are a pain to deal with. They are a little bit of an obsticle, but they should be left in place. Here’s what I like to do.
Removing the frets with nubs is done the exact same way as removing any other fret. Check out my fret removal article for more info.
Replacing your frets is a little more different however. Since you want to keep the fretboard nubs in tact, you are going to want to cut the fret the same width of the fretboard. This way the fret will fit right between the two nubs. You may need to cut the fret, set it in place, and file it a little bit in order to get the right fit. Once you have it cut to size, installing frets with nubs is exactly like installing any other fret. Here’s some more info on how to install guitar frets.
Replacing Fretboard Binding with Nibs
Replacing fretboard binding with nibs is much different than replacing regular fretboard binding. Believe it or not, replacing binding with nibs is actually pretty easy though. Since the frets don’t overlap the binding, you don’t have to remove the frets in order to take the loose or broken binding off the guitar. You can just remove the binding. Seems pretty easy, right? Let’s get started.
Score the edges of the Binding
Before you go pulling the binding off the edges of the fretboard, it is important to score the lacquer. If you pull the binding off without scoring the lacquer, you will crack and pull the finish off with the binding. Scoring the finish will help prevent the finish from cracking. Simply, score the edges of the binding with a razor blade or X-acto knife. You want to make a cut into the finish of the guitar on the edges of the binding. Essentially, you will be cutting the finish, so the finish on the binding and the finish on the neck are separated.
Remove the Loose Binding
VERY carefully take a putty knife and wedge it in between the binding and the fretboard. Wiggle it back and forth and work your way across the fretboard. Watch for tears in the finish and go slowly. This is a time consuming repair if you want to do it properly.
Clean the Binding Channel
To clean the binding channel, simply take a small file or razor blade and file or scrape away the glue that is left in the channel after the binding is removed.
Glue and tape the Binding
Now that the binding channel is properly cleaned, you can glue the binding in place. First, make sure your binding is the right height. You will want your binding to sit in the channel and extend to the top of the frets. This way the binding will cover the ends of the frets. After you check the binding height, it’s time to start gluing.
If you are gluing plastic binding, I would use Satellite City Super glue. DO NOT use acetone based glues, as they can cause problems with clean up and the finish on the binding. If you are gluing wood binding, I would use Tite-bond. You can read more about glue types on the glue page. Drop a line of glue in the channel. Do not get carried away. It does not take a ton of glue and you don’t want a huge mess on your hands after the binding is glued on. Once you have the glue in the channel, carefully press the binding against the fretboard and tape it in place with painter’s tape. Make sure to research what tape you are using and what kind of finish your guitar has. The adhesive on the tape can ruin your guitar’s finish. After the binding is glued in place and secured with some tape, let the glue dry for an hour or so.
Shape the Fretboard Binding Nibs
Once the binding glue is dried, the real work begins. I’m just joking. Shaping the nibs is actually really simple. File down the binding between the frets with a sharp file or scraper until it is flush with the fretboard and leave the binding in place next to the frets. Make sure you file from the outside of the fretboard to the inside. If you file from the inside to the outside, you could actually knock the binding loose or even crack it. Be careful not to hit the opposite binding with the file. It’s easiest to use short file strokes until the binding is filed down flush with the top of the fretboard.
Once all the binding between the frets is filed down, you should be left with square notches of binding that are sticking up by each fret end. Use a small file to carefully shape the square notch into a rounded nib that matches the shape of the fret. I like to use a rounded fret file because it is much faster, but a small file or triangle file works just fine.
That’s it. Now your fretboard binding is nice and new with the original character and design of the guitar in tact.
Spray the Finish
You might need to spray a tint of yellow or some color on the binding to make it match the original binding. If you do, you should tape off the body and the fretboard of the guitar to protect it from overspray. I would spray two or three light coats of clear lacquer, sand the finish, and spray two or three more coats of clear before you spray the color. After the color is sprayed, you can spray a few more clear coats of finish and remove the tape.
Once the tape is removed from the neck, you will notice that the edge of the binding will have a sharp where the lacquer has built up on the edge of the binding and the tape. Simply, file the top edges of the binding toward the middle of the fretboard to get rid of the sharp lacquered edge. Finally, you can wet sand and polish the new finish. See the electric guitar finish page for more instructions on how to spray the finish on your neck. You may not have to spray a lacquer finish on your neck. Many guitars have an oil finish on their necks. In this case, you will not need to spray the finish at all. After you have applied your finish of choice, your neck should look good as new.
Level a Fretboard with Fretboard Binding Nibs
As much as I try to keep guitars original when I repair them, sometimes it is nearly impossible. A good example is leveling the fretboard on a guitar with fretboard binding nibs. In order to level the fretboard, you have to sand down the fretboard with a fret leveling bar. Unfortunately, it is impossible to sand all the way out to the edge of the fretboard when the nibs are sticking up. That’s why they usually get sanded off in the process. New binding can always be put back on to give the guitar nibs again, but if the fretboard needs to be leveled most of the time the nibs need to go too. Check out my article on how to level electric guitar fretboards for more info.
That’s pretty much everything you need to know about how to work with and repair guitars with fretboard binding nibs. I hope you learned some new techniques for repairing guitar nibs. Now you know what to do the next time you see those nubs on the sides of the frets. Now that you’re done with the binding it’s time to play your guitar.
